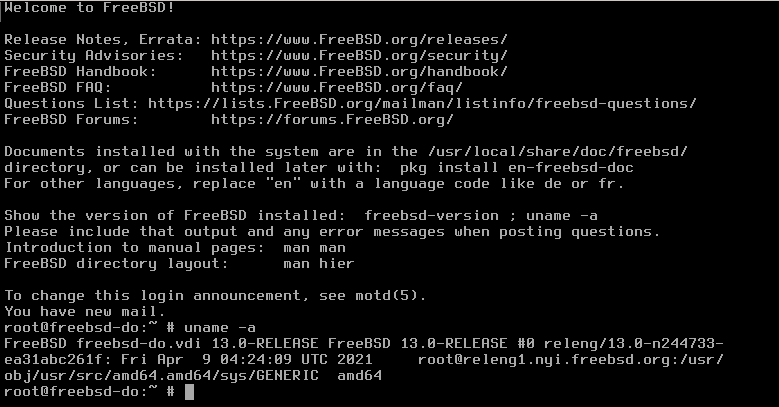
Due to DigitalOcean not releasing ready to use images for FreeBSD 13 at this time, and since I opened a ticket a couple of months ago without a strong positive message from DigitalOcean supporting FreeBSD 13, I’ve decided to make use of their custom image upload service and give it a go. I must say DigitalOcean replied to me privately. Furthermore FreeBSD 13 was released back in April 2021, it is almost one year later, and it still hasn’t been given full support from DigitalOcean. In this time though, the hosting company has had enough time and placed the efforts to incorporate CentOS Stream and Rocky Linux. I just wish customers like me, using FreeBSD, would’ve received the same attention. Because of all this I have decided to write this how to upload a FreeBSD custom image guide.
If you find the articles in Adminbyaccident.com useful to you, please consider making a donation.
Use this link to get $200 credit at DigitalOcean and support Adminbyaccident.com costs.
Get $100 credit for free at Vultr using this link and support Adminbyaccident.com costs.
Mind Vultr supports FreeBSD on their VPS offer.
What is this custom image service all about? Basically, as a user of the platform one is allowed to upload custom images of operating systems and spin off droplets (virtual machines) from those images. If, for whatever the reason, DigitalOcean stops supporting FreeBSD as a platform in their default base images for droplets, one could make use of this service and upload a custom FreeBSD image and create droplets (virtual machines) at DigitalOcean. This, of course, can be used for any GNU/Linux platform of your choice, giving the user a very flexible tool, since custom images with already baked configurations and installed software can be uploaded and used almost instantly. This is general guide; however, I’d recommend anyone using FreeBSD to follow this one you’re reading.
Summary of contents
The summary of how to upload a FreeBSD custom image on DigitalOcean reads as follows:
As ground zero we will see what this is all about, the basic requirements and limitations of the platform DigitalOcean has set up to upload custom images. After that we will see how to obtain a FreeBSD 13 image to be used as a base for later use in our DigitalOcean account. We will fire up that image as a virtual machine in our local environment using VirtualBox.
Then we will install the necessary bits onto it so it can work inside DigitalOcean later, for example accepting the given network configuration set up by this cloud provider. I have also added a couple of optional steps focused on security.
At the end of the article, we will see how to upload a customized image from our local facilities/environment into our DigitalOcean account. From this image, now inside DigitalOcean, we will see how to spin off a droplet (virtual machine) and be ready to operate with it. As the last step, just in case, I have also added information on how to recover the root password.
Requirements and limitations.
First things first. Not every type of virtual disk image can be uploaded. For instance, the .iso file from the FreeBSD project nor any other GNU/Linux one can be used. Which type of images are supported? These are:
- Raw (.img) with an MBR or GPT partition table
- qcow2
- VHDX
- VDI
- VMDK
They can’t be bigger than 100GB, the operating system in them must be a UNIX-like system and cloud-init must be installed. There’s a requirement for the file systems in the image to be ext3 or ext4, but this is not a hard requirement, since FreeBSD isn’t using any of those and perfectly works with the traditional UFS and the modern ZFS.
There are other changes/limitations when using custom images, such as using DHCP for network configuration by default and only option. More problematic for some is the fact IPv6 can’t be used since it’s not supported on custom images. These droplets have password login disabled so only SSH keys can be used (more on that later). And very importantly the root password can’t be changed/recovered from the control panel. However, we’ll be able to reset the root password through the recovery console, which is explained at the bottom of this article.
What is cloud-init? This is the secret sauce that allows cloud providers such as DigitalOcean or AWS to inject specific configurations when firing up virtual instances for their customers. For example, the network configuration is set on the fly when the system starts up. This was well explained when FreeBSD was launched as a supported operating system in DigitalOcean back in 2015.
Meeting these simple requirements is very easy. So, let’s dig into this how to upload a FreeBSD custom image on DigtialOcean.
Step 1.- Get a virtual machine image with FreeBSD on it.
There are many articles and guides around on how to install FreeBSD into a virtual machine. I’ve tried both VirtualBox and Microsoft’s Hyper-V formats successfully. But there are other easy ways to obtain such an image.
For example, the FreeBSD project releases not just iso images but ready to go virtual machine instances on their site. If you choose the right format, you will not be able to use it straight away into DigitalOcean since an important configuration and software is still missing, the cloud-init. More on that in step 2.
There’s an alternative method to those two, which consists in using already to use virtual machine images with cloud-init already configured and a user pre-configured by default. Those can be found here.
The advantage of this last method is there’s no need to configure or do anything other than getting the image and uploading it into our DigitalOcean account. There’s a downside to this method though. This image is not official, and I have no clue who’s baked it and what’s on it. If you’re a security folk avoid using it if this a concerning risk.
In this how to upload a FreeBSD custom image guide I’ll be using a VirtualBox image, but most of it will work with other hypervisors such as Hyper-V, VMWare, etc.
Step 2.- Install and configure cloud-init on FreeBSD 13.
We’ve got a running virtual machine with FreeBSD 13 on it. In this step we’ll add the necessary software for the hosting provider, in this case DigitalOcean but applicable to others, to be able to interact with any virtual machine we create from the custom image we’re preparing. That software is called cloud-init.
Tip 1: Remember to add a user so, you’ll be able to login into the system, since FreeBSD doesn’t allow remote root login by default.
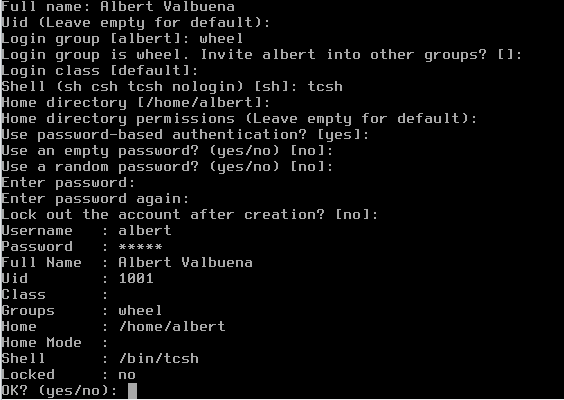
Tip 2: Mind you’ll probably want that user to be able to escalate privileges with sudo. Install it too. This script may be of help. Use it at your own discretion, and only if you know what you’re doing. Remember to make the necessary adjustments by using ‘visudo’.
Now install cloud-init on the virtual machine. How? Very simple. Look for the cloud-init package and install it.
albert@BSD-DO:~ % sudo pkg search cloud-init
py38-cloud-init-21.4 Init scripts for use on cloud images
albert@BSD-DO:~ % sudo pkg install -y py38-cloud-init
Updating FreeBSD repository catalogue...
FreeBSD repository is up to date.
All repositories are up to date.
The following 35 package(s) will be affected (of 0 checked):
.........
albert@BSD-DO:~ %
In order to enable cloud-init at boot time the service needs to be declared in the system configuration file named /etc/rc.conf.
We could use the sysrc command to do just that but that would put this necessary line at the bottom of the file, and we need this to be at the very top. So, we’ll manually at the following line at the top of the file using our favorite editor.
cloudinit_enable="YES"
Is this all? Almost done. Just cat your /etc/rc.conf file so you’re sure of what’s inside.
albert@BSD-DO:~ % cat /etc/rc.conf
cloudinit_enable="YES"
hostname="BSD-DO"
keymap="es.acc.kbd"
ifconfig_em0="DHCP"
sshd_enable="YES"
ntpdate_enable="YES"
ntpd_enable="YES"
# Set dumpdev to "AUTO" to enable crash dumps, "NO" to disable
dumpdev="NO"
zfs_enable="YES"
albert@BSD-DO:~ %
With cloud-init DigitalOcean will be able to inject our SSH keys, the hostname and the network configuration whenever we create a droplet from this custom image. Just in case, if for some reason DigitalOcean is unable to load the network configuration, we’ll add it here.
Just add the following lines at the bottom of the /etc/rc.conf file.
ifconfig_vtnet0=DHCP
ifconfig_vtnet1=DHCP
With these two lines we’ll ensure network connectivity with the droplet is present at boot time.
Tip: One must also acknowledge that the interface named ‘vtnet0’ is often assigned for publicly accessible IPs and ‘vtnet1’ is typically used for internal ones.
Alternatively, if you are planning to use this guide on a different hosting than DigitalOcean set the network configuration as follows:
ifconfig_DEFAULT="DHCP inet6 accept_rtadv"
This will work anywhere, and if IPv6 is supported and activated, it will make use of it as well. This seems to circumvent the limitation of IPv6 in DigitalOcean’s custom images but since the lack of clear and official support exists, use it at your own discretion. Any loss will be on you.
Now we’re sure the cloud-init software has been installed and we’ve also set the typical network configuration from DigitalOcean. This is an important step in this how to upload a FreeBSD custom image guide. We can now move on and jump into the next bit. We need to understand where cloud-init configuration sits, what changes we may need to apply before stopping the virtual machine and upload its image into DigitalOcean.
Tip. Disable Sendmail if you will not make use of it by setting up the following directive into /etc/rc.conf. The rule of thumb is: if you’re not using this box for sending e-mail, just disable this.
sendmail_enable="NONE"
Step 3. Configuring cloud-init.
Cloud-init, as explained before, will allow any cloud hosting company to inject network configuration and similar arrangements, such as SSH keys, into the boxes (virtual machines) and provide other types of services for their customers. The cloud-init FreeBSD package will provide a default configuration we may need to pay attention to and probably make little changes.
Where does the cloud-init configuration sit? Where all third-party software sits in FreeBSD. Inside /usr/local/etc.
albert@BSD-DO:/usr/local/etc/cloud % pwd
/usr/local/etc/cloud
albert@BSD-DO:/usr/local/etc/cloud %
What’s inside? This below.
albert@BSD-DO:/usr/local/etc/cloud % ll
total 14
-rw-r--r-- 1 root wheel 2342 Mar 11 12:05 cloud.cfg
drwxr-xr-x 2 root wheel 5 Mar 12 22:53 cloud.cfg.d/
drwxr-xr-x 2 root wheel 30 Mar 12 22:53 templates/
albert@BSD-DO:/usr/local/etc/cloud %
There’s not much to do, but the defaults may not suit your particular instance of FreeBSD, especially your username and shell. Those are found at the bottom portion of the ‘cloud.cfg’ file.
albert@BSD-DO:/usr/local/etc/cloud % sudo tail cloud.cfg
# Default user name + that default users groups (if added/used)
default_user:
name: freebsd
lock_passwd: True
gecos: FreeBSD
groups: [wheel]
sudo: ["ALL=(ALL) NOPASSWD:ALL"]
shell: /bin/tcsh
network:
renderers: ['freebsd']
albert@BSD-DO:/usr/local/etc/cloud %
As it can be read, the default user cloud-init contemplates is named ‘freebsd’. Yours may be different. Change the value to your needs. Don’t skip this step or you will easily end up using the recovery console from DigitalOcean.
There is another consideration to be made and that is the shell. On this virtual machine the shell is set to use tcsh. However, you may be considering using some other shell on this now virtual machine and later custom image at your cloud services provider. Change the value in shell and adjust it to the one of your choice.
In my case I’ve set up a user that is named ‘albert’ and not ‘freebsd’. I’ll change that. And I plan to use bash instead of tcsh, which I have installed aside. I will need to change the path in the shell value.
If I read the bottom of the cloud-init configuration file this is what can be read now:
[albert@BSD-DO /usr/local/etc/cloud]$ tail cloud.cfg
# Default user name + that default users groups (if added/used)
default_user:
name: albert
lock_passwd: True
gecos: FreeBSD
groups: [wheel]
sudo: ["ALL=(ALL) NOPASSWD:ALL"]
shell: /usr/local/bin/bash
network:
renderers: ['albert']
[albert@BSD-DO /usr/local/etc/cloud]$
Cloud-init is now configured inside this virtual machine. With this in place we can skip the next steps 4 and 5 in this how to upload a FreeBSD custom image tutorial. However, we can make further configuration changes to make it safer. Let’s do that before we stop the VM and upload it into DigitalOcean.
Step 4.- Configure a firewall. (Optional)
Believe it or not, too often cloud providers do offer virtual machines with the firewall down, often relying on the distribution defaults. Since FreeBSD has 3 different firewall options, none is set up by default. We’ll now configure a basic firewall set up so we can use our box remotely via ssh and nothing else.
Edit your /etc/rc.conf file and add the following lines:
# Simple IPFW firewall
firewall_enable="YES"
firewall_quiet="YES"
firewall_type="workstation"
firewall_logdeny="YES"
firewall_allowservices="any"
firewall_myservices="22/tcp"
Once those are in you can start up the IPFW firewall and connect into the virtual machine using port 22.
[albert@BSD-DO ~]$ sudo service ipfw start
Firewall rules loaded.
[albert@BSD-DO ~]$
[albert@BSD-DO ~]$ sudo service ipfw status
ipfw is enabled
[albert@BSD-DO ~]$
With this optional step we’ve set basic security into our virtual machine. However, it can be further enhanced when applying the next step.
Step 5.- Disable remote login with username and password. (Optional)
The internet is nowadays a wild place. Bots are attempting to login into systems using username and password combinations from all time leaks. Yours might have not been stolen or leaked yet. But they may be in the future. Hence there’s a need to disable the possibility to remotely login into the box with a username and password in the ssh configuration and make mandatory use of SSH keys. DigitalOcean claims it makes mandatory use of SSH keys with FreeBSD droplets and custom image derived ones but that doesn’t avoid the need to apply this configuration change. So, let’s do just that.
Tip: Why make this if DigitalOcean does this mandatory in the first place. Basically, this will not be disabled by default in our custom image. The possibility to log in with username and password will exist if we do not disable it. It is a good practice to use SSH and avoid passwords.
First, we’ll place a public key we have in use. This is important since, if we don’t put those inside, we’ll lose the ability to remotely login into this virtual machine while in our local environment.
Create an empty and hidden directory named ssh in your user’s home directory.
[albert@BSD-DO ~]$ mkdir .ssh
[albert@BSD-DO ~]$
Once that’s done create an empty file inside called ‘authorized_keys’.
[albert@BSD-DO ~/.ssh]$ touch authorized_keys
[albert@BSD-DO ~/.ssh]$ ll
total 10
drwxr-xr-x 2 albert wheel 3B Mar 13 00:06 .
drwxr-xr-x 3 albert wheel 13B Mar 13 00:05 ..
-rw-r--r-- 1 albert wheel 0B Mar 13 00:06 authorized_keys
[albert@BSD-DO ~/.ssh]$
With that file already created it’s time to fill it up with one of our public keys. Are you using Windows and PuTTY? This guide at DigitalOcean may be of very good help for you. Are you using a UNIX-like OS instead? Your public key is probably identified as a .pub extension file, and it is probably sitting under /home/username/.ssh and it’s named id_rsa.pub. Grab the content of such file and paste it inside the ‘authorized_keys’ you’ve just created. If you are in a UNIX-like system and you’ve never heard of this process, use this guide carefully.
With your public key inside the virtual machine one can now disable the ability to login into the box using username and password.
You’ll have to look for the ‘ChallengeResponseAuthentication’ directive in the sshd_conf file.
[albert@BSD-DO /etc/ssh]$ grep -n 'ChallengeResponseAuthentication' sshd_config
65:#ChallengeResponseAuthentication yes
79:# be allowed through the ChallengeResponseAuthentication and
81:# PAM authentication via ChallengeResponseAuthentication may bypass
85:# and ChallengeResponseAuthentication to 'no'.
[albert@BSD-DO /etc/ssh]$
The directive is sitting in the line 65. Let’s edit it with your favorite editor and set its value to ‘no’.
Before:
#ChallengeResponseAuthentication yes
After:
ChallengeResponseAuthentication no
Restart the SSH service in order to the changes be effective.
[albert@BSD-DO /etc/ssh]$ sudo service sshd restart
Performing sanity check on sshd configuration.
Stopping sshd.
Performing sanity check on sshd configuration.
Starting sshd.
[albert@BSD-DO /etc/ssh]$
With this change we’ve now disabled the possibility for anyone to use the username and password combination to login into any droplet we may create using this FreeBSD custom image in DigitalOcean.
Tip: Remember DigitalOcean will inject your stored SSH keys at droplet creation time. This is one of the reasons we previously installed cloud-init.
Step 6.- Upload the image into your DigitalOcean account.
The process to upload a FreeBSD 13 custom image into a DigitalOcean account is simple. For images below 2GB in size just use your browser and click the buttons on the page. For the rest of methods, such as using the ‘Spaces’ service at DigitalOcean refer to their documentation.
Our virtual machine image, if we haven’t installed extra software or add data should have a small footprint, so it will suffice by using the control panel and our browser.
Of course, one needs to stop the virtual machine in the local box we’ve set it up.
[albert@BSD-DO ~]$ sudo shutdown -p now
Shutdown NOW!
shutdown: [pid 1397]
[albert@BSD-DO ~]$
*** FINAL System shutdown message from albert@BSD-DO ***
System going down IMMEDIATELY
System shutdown time has arrived
Connection to 192.168.1.253 closed by remote host.
Connection to 192.168.1.253 closed.
[albert@Fedora35]$
Using the control panel, we’ll navigate into our VirtualBox VMs folder and look for the ‘.vdi’ file correspondent to the virtual machine we’ve just been configuring.
Click on ‘Add image’.
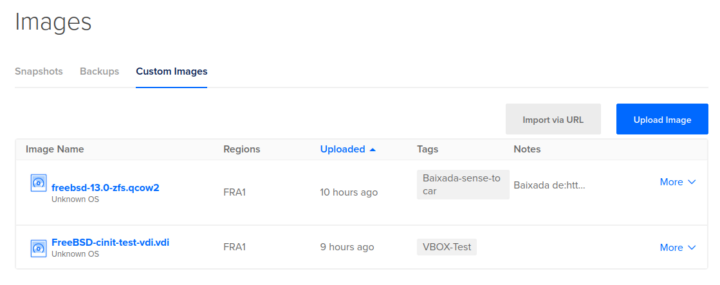
Now click on ‘Upload image’ and browse in your folders.

Select the file image you want to upload. Remember it must be a .vdi extension file.
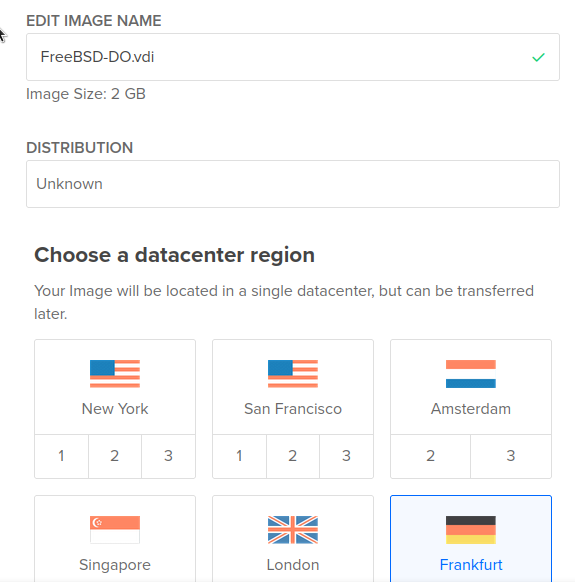
As above set the image name you desire, select the ‘Unkown’ type of image and the datacenter region of your choice.
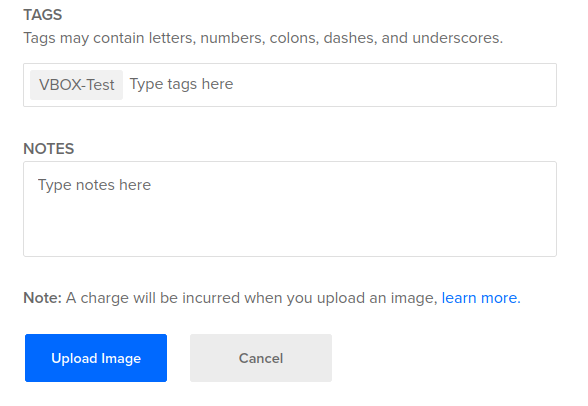
Add the tags you may need and click onto ‘Upload Image’. Now wait until it’s finished.
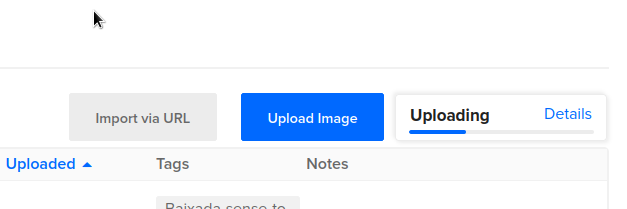
Whenever it’s finished, you’ll receive a notification. Or at least you should, sometimes it hangs.
This is the result you should get.
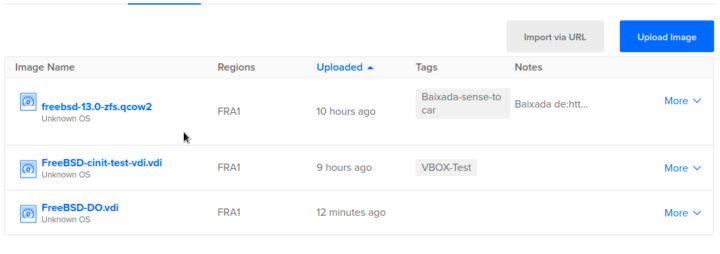
Notice the image we’ve been working during this article is FreeBSD-DO.vdi. Now it’s here and what was the virtual machine hard disk image is now your custom FreeBSD 13 image on DigitalOcean.
Step 7.- Create a Droplet (VM) with your FreeBSD 13 custom image.
The real proof this custom image creation and upload process works, and the time we’ve spent doing this is worthy is by creating a fresh droplet from this very image we’ve just finished uploading.
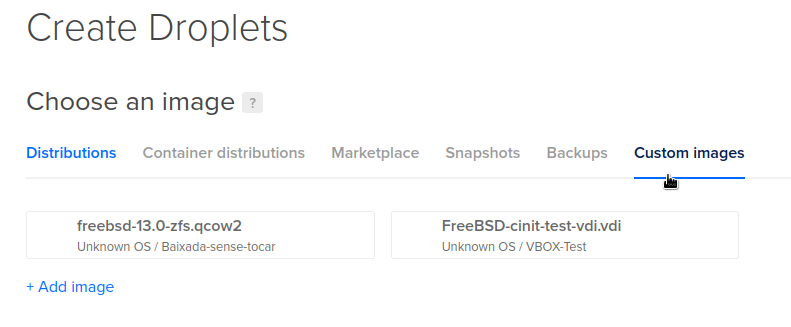
Click on ‘Create Droplet’ and instead of selecting a default image from DigitalOcean (found under ‘Distributions’), choose one from your ‘Custom images’.

I will choose FreeBSD-DO.vdi in this guide.
After selecting the different options, such as droplet size, datacenter, the SSH keys you’ve pre-loaded, the droplet name, etc. You should see the recently created droplet in your resources panel.

And there it is. Sitting alone waiting for us to connect into it with our SSH keys.
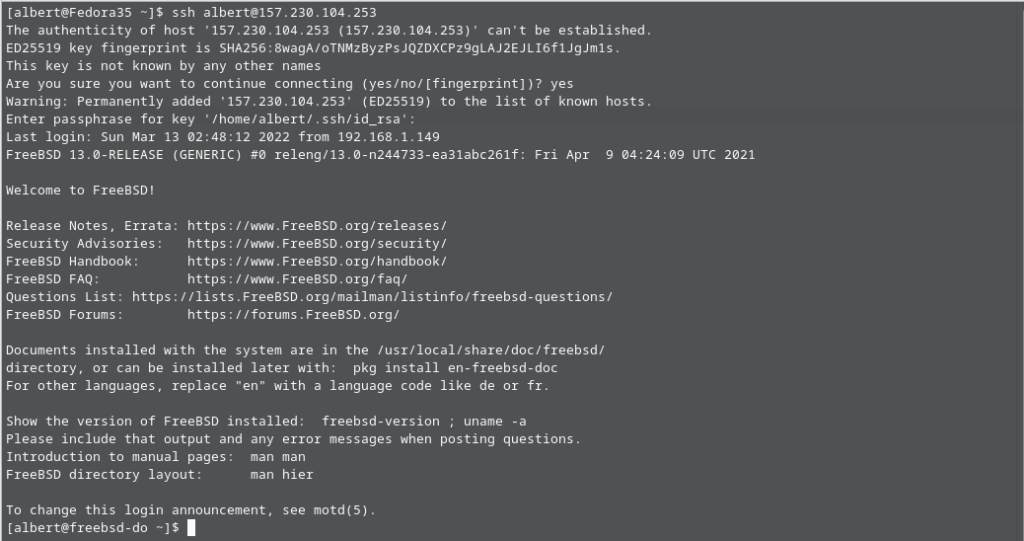
As it can be seen the droplet is up and running and I’ve been able to successfully log into it. We’re done on this how to upload a FreeBSD custom image guide.
Extra. – Reset root password from the ‘recovery console’ (Recovery purposes only).
In the first chapter we’ve seen some of the limitations of using custom images. One of those is being able to reset the root password from the DigitalOcean’s control panel, if we’ve lost it or we’re suspicious someone has stolen it. There is a solution for that with FreeBSD, and the following steps will just show you that.
Access your ‘recovery console’. This will open a window in your browser. Immediately reboot your machine with the ‘power cycle’ option from the control panel in the main window. Switch back quickly to the browser window with the ‘recovery console’ on it. Watch it boot and wait until the boot options appear in your window.
Tip: Press any key but ‘enter’ to stop the 10 second countdown.
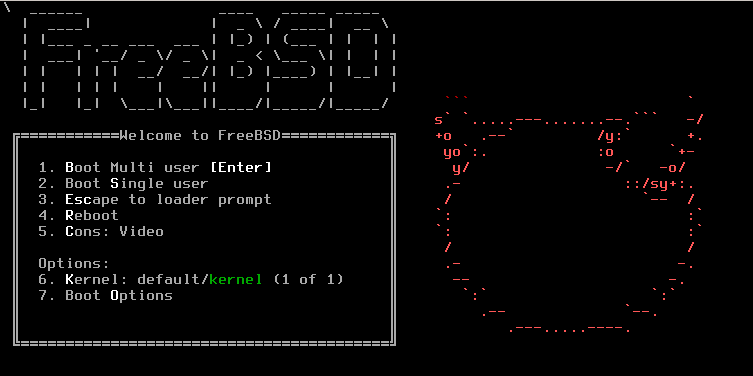
Select option 2. This will boot FreeBSD and will lead you to a single user mode state.
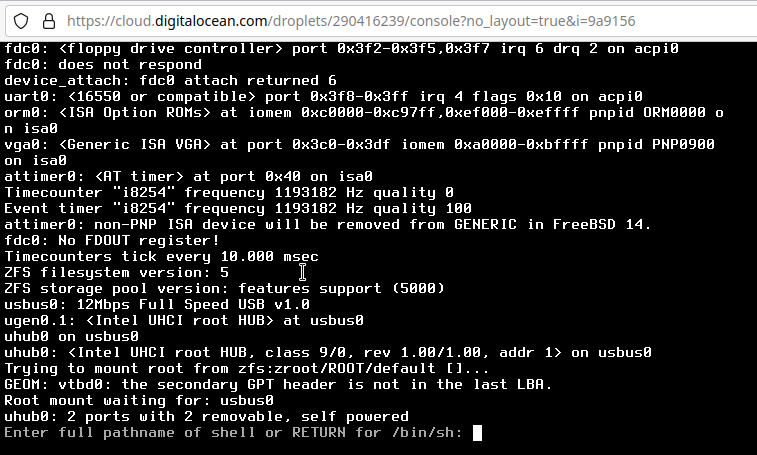
Click enter when you see the prompt above. Then mount the file system as follows:

Type ‘mount -u –a –o rw’ to mount the file system.
# mount –u –a –o rw
Tip: The recovery console may not recognize our keyboard and we may have issues when typing on it. Use a text editor and copy-paste the commands so you can type in the necessary commands.
This mount command above will mount the file system as ‘read-only’, which will not be very useful. Mount it now as read-write.
# mount –o rw –u /
After having mounted the file system able to write change the /etc/passwd file permissions. Then issue the ‘passwd’ command to change the root password.

Restore the file permissions.

Reboot the box.

Watch the boot process through the ‘recovery console’ and log in whenever the prompt allows you to do so.

And there we go. The root password has been reset and we’ve been able to log back in as root.
Conclusion.
FreeBSD is a great UNIX-like operating system which currently can be used at DigitalOcean and despite their lack of clear full support for it with version 13, their custom image service can be leveraged to make use of this great platform without a hassle.
This custom image service allows more than just using some other UNIX-like platforms, but it also gives users and teams the possibility to upload images containing configurations and data specific to their use and needs. As you’ve seen in this article, we’ve set up the firewall in the VM before it has touched the internet. Imagine being able to apply any configuration specific to you or your company and also firing up droplets under demand using DigitalOcean’s API.
I hope this how to upload a FreeBSD custom image guide helps anyone using these cloud platforms.
If you find the articles in Adminbyaccident.com useful to you, please consider making a donation.
Use this link to get $200 credit at DigitalOcean and support Adminbyaccident.com costs.
Get $100 credit for free at Vultr using this link and support Adminbyaccident.com costs.
Mind Vultr supports FreeBSD on their VPS offer.