FreeBSD Jails is an awesome tool similar to Docker but much older which allows administrators and developers alike to have several securely contained userland environments sharing one kernel. Does it sound familiar? This is operating-system-level virtualization and it’s different than what you find on KVM or Xen camps. For more detailed information I’ve published some other related articles to Jails, but the internet is full of nice information.
In this article we’re going to see how to export and import FreeBSD jails which is very similar to what you do with Docker images but on the FreeBSD. If you haven’t ever set up a FreeBSD jail there is also an article for it so you may want to read it first.
If you find the articles in Adminbyaccident.com useful to you, please consider making a donation.
Use this link to get $200 credit at DigitalOcean and support Adminbyaccident.com costs.
Get $100 credit for free at Vultr using this link and support Adminbyaccident.com costs.
Mind Vultr supports FreeBSD on their VPS offer.
To summarize this how to export and import FreeBSD Jails we are going to:
1.- List the available Jails on the system.
2.- Export one Jail to a portable format.
3.- Copy the exported Jail through the network.
4.- Import the copy of that Jail into that other system.
5.- Fire it up and test.
We are going to leverage the awesome ZFS file system. Not only because of the ease of use but for convenience. If you plan to use the UFS file system you may want to use other tools. Here we are going to make good use of iocage a great tool written in Python.
1.- List the available Jails on the system.
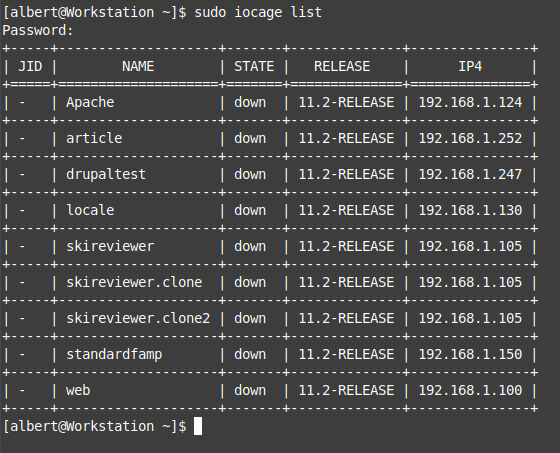
By issuing the command ‘iocage’ with the ‘list’ option you obtain the list of available Jails on a system.

There are several characteristics of Jails you can manage through iocage. For further detail refer to the official documentation or the man page. When you list them you can see just a few like the jail name, if it’s up and running, the release it’s based on and the IP address. You can change those with iocage and you can even for example set them to fire up at system’s boot time.
2.- Export one Jail to a portable format.
Let’s imagine we are a developer or a sysadmin with an already predefined AMP (Apache MySQL PHP) structure. So, as already explained on a previous article, you have set a FreeBSD Jail and you now want to make use of this same configuration, settings, and software stack to another machine. For example you have developed an application and you are currently running it on a Jail and you want to pass it to another team member, or even you want to test it on a current integration server. You could be someone else like a system adminstrator who has tuned the Jail to the optimal performance level and now you want to move it into production. Here’s how.
We are going to grab our ‘standardfamp’ jail and export it.
[albert@Workstation ~]$ sudo iocage export standardfamp
Exporting dataset: zroot/iocage/jails/standardfamp
Exporting dataset: zroot/iocage/jails/standardfamp/root
Preparing zip file: /iocage/images/standardfamp_2018-12-23.zip.
Exported: /iocage/images/standardfamp_2018-12-23.zip
[albert@Workstation ~]$
So our exported jail now sits under the /iocage/images directory, on a file named standardfamp_2018-12-23.zip. Let’s move on to the next chapter of this how to export and import FreeBSD Jails.
3.- Copy the exported Jail through the network.
We’re going to move the jail to another box. In this case over the local network but of course you can do this anywhere with a network connection and an open port available.
[albert@Workstation ~]$ scp /iocage/images/standardfamp_2018-12-23.zip [email protected]:/home/albert
Password for albert@Jails:
standardfamp_2018-12-23.zip 100% 882MB 62.5MB/s 00:14
[albert@Workstation ~]$
So we now log in to our destination box and check for the file.
albert@Jails:~ % ll
total 903425
-rw-r--r-- 1 albert wheel 1054 Dec 23 01:16 .cshrc
-rw------- 1 albert wheel 1003 Dec 23 21:42 .history
-rw-r--r-- 1 albert wheel 392 Dec 23 01:16 .login
-rw-r--r-- 1 albert wheel 163 Dec 23 01:16 .login_conf
-rw------- 1 albert wheel 379 Dec 23 01:16 .mail_aliases
-rw-r--r-- 1 albert wheel 339 Dec 23 01:16 .mailrc
-rw-r--r-- 1 albert wheel 954 Dec 23 01:16 .profile
-rw-r--r-- 1 albert wheel 851 Dec 23 01:16 .shrc
-rw-r--r-- 1 albert wheel 925291944 Dec 23 21:45 standardfamp_2018-12-23.zip
albert@Jails:~ %
So there it is. Let’s move on and impor it.
4.- Import the copy of that Jail into that other system.
First of all we move the file into its correct location, inside the /iocage/images directory.
albert@Jails:~ % sudo mv standardfamp_2018-12-23.zip /iocage/images
albert@Jails:~ % ll /iocage/images
total 903389
-rw-r--r-- 1 albert wheel 925291944 Dec 23 21:45 standardfamp_2018-12-23.zip
albert@Jails:~ %
We change the ownership from the regular user to root.
albert@Jails:~ % sudo chown root:wheel /iocage/images/standardfamp_2018-12-23.zip
albert@Jails:~ % ll /iocage/images
total 903389
-rw-r--r-- 1 root wheel 925291944 Dec 23 21:45 standardfamp_2018-12-23.zip
albert@Jails:~ %
We now import the Jail.
albert@Jails:~ % sudo iocage import standardfamp
Importing dataset: standardfamp
Importing dataset: standardfamp/root
Imported: standardfamp
albert@Jails:~ %
One minute later the jail has been imported. Let’s check it is there.
albert@Jails:~ % sudo iocage list
+-----+--------------+-------+--------------+---------------+
| JID | NAME | STATE | RELEASE | IP4 |
+=====+==============+=======+==============+===============+
| - | Test | down | 11.2-RELEASE | 192.168.1.150 |
+-----+--------------+-------+--------------+---------------+
| - | standardfamp | down | 11.2-RELEASE | 192.168.1.150 |
+-----+--------------+-------+--------------+---------------+
albert@Jails:~ %
And there it is, sitting next to a pre-existant jail called ‘Test’. Time now for the final check.
5.- Fire it up and test.
We are now going to fire up our recently imported jail. You could do some changes before that, for example if you weren’t happy with the given IP address you could change it before starting it up by using the ‘iocage’ command and the ‘set ip4_addr’ option. You can change any property. For further detail refer to the official documentation. And for the sake of completeness we’re going to assing it a different ip.
albert@Jails:~ % sudo iocage set ip4_addr="em0|192.168.1.130/24" standardfamp
Property: ip4_addr has been updated to em0|192.168.1.130/24
albert@Jails:~ %
We check the change has been applied.
albert@Jails:~ % sudo iocage get ip4_addr standardfamp
em0|192.168.1.130/24
albert@Jails:~ %
So yes, the change is effective. Let’s now start up the jail.
albert@Jails:~ % sudo iocage start standardfamp
* Starting standardfamp
+ Started OK
+ Starting services OK
albert@Jails:~ %
It is now time to log in and test it.
albert@Jails:~ % sudo iocage console standardfamp
Last login: Wed Nov 28 21:51:50 on pts/1
FreeBSD 12.0-RELEASE r341666 GENERIC
Welcome to FreeBSD!
Release Notes, Errata: https://www.FreeBSD.org/releases/
Security Advisories: https://www.FreeBSD.org/security/
FreeBSD Handbook: https://www.FreeBSD.org/handbook/
FreeBSD FAQ: https://www.FreeBSD.org/faq/
Questions List: https://lists.FreeBSD.org/mailman/listinfo/freebsd-questions/
FreeBSD Forums: https://forums.FreeBSD.org/
Documents installed with the system are in the /usr/local/share/doc/freebsd/
directory, or can be installed later with: pkg install en-freebsd-doc
For other languages, replace "en" with a language code like de or fr.
Show the version of FreeBSD installed: freebsd-version ; uname -a
Please include that output and any error messages when posting questions.
Introduction to manual pages: man man
FreeBSD directory layout: man hier
Edit /etc/motd to change this login announcement.
root@standardfamp:~ #
Once in let’s check if Apache is running.
root@standardfamp:~ # ps aux | grep httpd
root 1115 0.0 0.6 22212 11768 - SsJ 22:01 0:00.01 /usr/local/sbin/httpd -DNOHTTPACCEPT
www 1146 0.0 0.6 22212 11776 - IJ 22:01 0:00.00 /usr/local/sbin/httpd -DNOHTTPACCEPT
www 1147 0.0 0.6 22212 11776 - IJ 22:01 0:00.00 /usr/local/sbin/httpd -DNOHTTPACCEPT
www 1148 0.0 0.6 22212 11776 - IJ 22:01 0:00.00 /usr/local/sbin/httpd -DNOHTTPACCEPT
www 1149 0.0 0.6 22212 11776 - IJ 22:01 0:00.00 /usr/local/sbin/httpd -DNOHTTPACCEPT
www 1150 0.0 0.6 22212 11776 - IJ 22:01 0:00.00 /usr/local/sbin/httpd -DNOHTTPACCEPT
root 1167 0.0 0.0 408 324 0 R+J 22:02 0:00.00 grep httpd
root@standardfamp:~ #
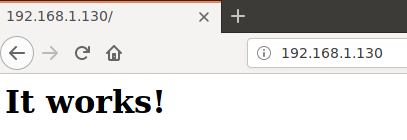
We test it through the browser too.

Let’s now check for MariaDB.
root@standardfamp:~ # ps aux | grep mysql
mysql 1025 0.0 0.1 7064 2640 - IsJ 22:01 0:00.00 /bin/sh /usr/local/bin/mysqld_safe – defaults-extra-file=/var/db/mysql/my.cnf --user=mysql
mysql 1090 0.0 4.2 544968 85452 - IJ 22:01 0:00.17 /usr/local/libexec/mysqld –defaults- extra-file=/var/db/mysql/my.cnf --basedir=/usr/local
root 1171 0.0 0.0 408 324 0 R+J 22:04 0:00.00 grep mysql
root@standardfamp:~ #
Yes, there it is.
This is all on this how to export and import FreeBSD Jails. I hope you can enjoy the power of Jails, ZFS and FreeBSD. This is great tooling since you can also observe processes in the jail from the ‘host’, but the jail doesn’t see anything from the ‘host’. It does not even now about its existance. So another use case is running untrusted or problematic software.
If you find the articles in Adminbyaccident.com useful to you, please consider making a donation.
Use this link to get $200 credit at DigitalOcean and support Adminbyaccident.com costs.
Get $100 credit for free at Vultr using this link and support Adminbyaccident.com costs.
Mind Vultr supports FreeBSD on their VPS offer.