Or better said, how to install Apache the hard way.
As mentioned before and many other times FreeBSD has two ways to install software. The easy one which is provided by the pkgng tool. And the not so easy one, ports. With ports you compile the programs and you can set the options the way you prefer. By the way… anyone using a Mac? Does anyone know about the Homebrew? Macports even? They are tools to install programs on Macs and since MacOSX (now macOS) is based on FreeBSD the idea is very similar. Ports and FreeBSD were started by some key people. Jordan Hubbard who was the UNIX Technology Chief at Apple for a few years happens to be the creator of Ports and one of the key contributors at the FreeBSD’s birth.
If you find the articles in Adminbyaccident.com useful to you, please consider making a donation.
Use this link to get $200 credit at DigitalOcean and support Adminbyaccident.com costs.
Get $100 credit for free at Vultr using this link and support Adminbyaccident.com costs.
Mind Vultr supports FreeBSD on their VPS offer.
Now… why the hard way? Is it hard at all? Well… it’s not that hard, it just takes a bit longer and you have to know what you’re doing. Quite frequently knowing what your doing takes some more time because you have to read several documents, articles, posts on websites, etc. Even if you choose the lazy way and play with Debian, and you are a newbie and you really don’t care so you copy-paste a bunch of commands, but you’ve read something about the mpm modes in Apache, you have to read. And yes, it takes some time!
Let’s use ports. To do that you will have to download them, extract them and use the specific tools and commands. Don’t forget to have a read to the official FreeBSD handbook.
To get the ports you have to type:
sudo portsnap fetch
This command will download all the ports found in FreeBSD which are more than 25.000, twenty-five thousand, programs available. After downloading them you have to extract them:
sudo portsnap extract
Extracting the ports takes some time, depending on your machine it will be faster or slower. Meanwhile get ready to look for some software. There are two versions of Apache in FreeBSD. The 2.2 branch and the more recent 2.4. Once the ports have been extracted just search for this software by typing:
whereis apache24
If you don’t know the program name there is an amazing website where you will find all these ports. It is called freshports.org. Visit it any time you struggle to find some program.
The output of the above command will tell you the directory where the config files are.

Just change directory into it by:
cd /usr/ports/www/apache24
Now type:
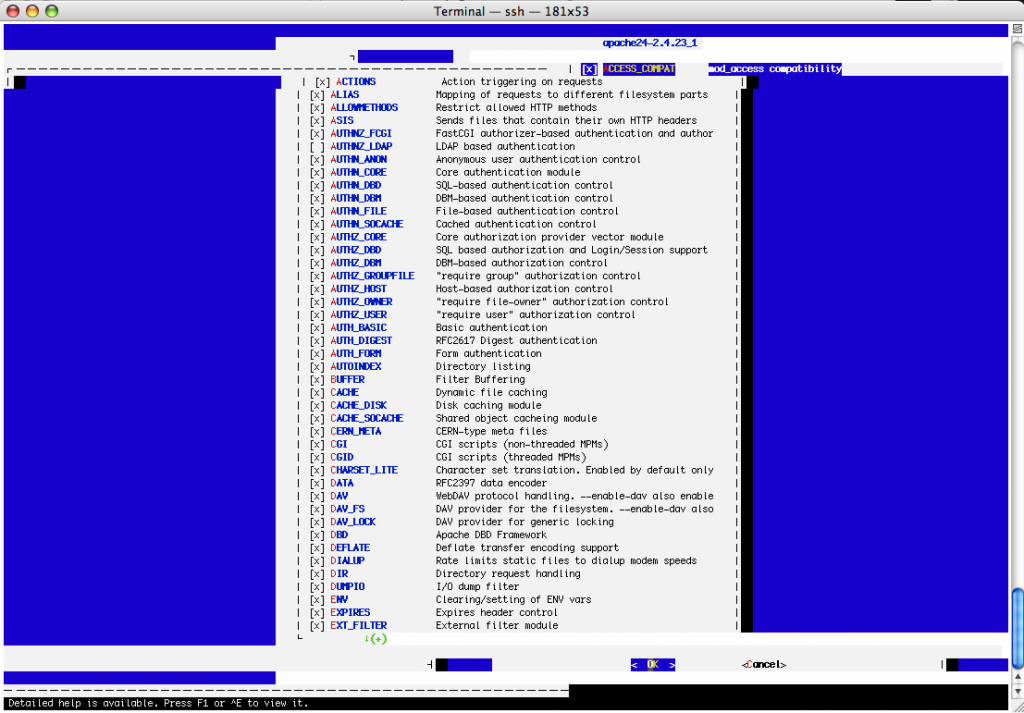
sudo make config
And a dialog will open. What you are looking at are all the options you can compile the program with. Since Apache is a big program suited for many purposes and is compatible with many things the list of options is quite long.

After choosing your desired options (if you leave the default options it’s almost the same as if you use the pkg system) it’s time to compile and install the program. Don’t do it yet. The command you will launch when tackling this part is the following:
sudo make install clean BATCH=yes
If you look at the manual or other sources on the internet you will see just sudo make install clean, and the BATCH=yes just a very few times. The ports system is clever enough to resolve the dependencies for any program. If Apache needs, let’s say make, and not the BSD make but the GNU one, it downloads it, it compiles it, installs it, and off you go. However there is a small “drawback”. Any time a dependency has to be configured before being installed the compiling stops and the options appear on the screen for your approval. If you need to really fine tune options everywhere this is fantastic. If you just need some configuration changes in one program and leave the dependencies as they are there is one solution. Just append BATCH=yes at the end of the command and they will go straight away as they are without asking anymore.
Now. Apache has three different operational modes. Pre-fork, worker and event. Pre-fork is the standard, the safest, the classic operation mode. It’s not fantastic, and not so great performance wise. I can’t give you a very technical explanation since I lack the knowledge, but that said let’s think a bit. Whenever a visitor hits your site the web server receives a request which is then sent to the application in charge. At the end hits some engine, some language interpreter. The AMP stack stands for, Apache, MySQL and the PHP language (and even Perl sometimes). A web server, a database and a language. The web server receives the request and has to answer it. The database has the data and the language plays both. And this playing is very important.
The classic way to make Apache and PHP play nicely is by installing a module called mod_php. This usually means Apache is configured to use the prefork mode. This is the default anywhere, not just FreeBSD but everywhere else, including the “hottest” Linux distros. By installing the mod_php you are somehow embedding the PHP language into the Apache web server. This module interprets the language into Apache so they are both a working unit.
There is however another way. Using CGI. It stands for Common Gateway Interface in the web servers world. Not to be confused by other meanings. Similarly to mod_php this is a way to operate the web server so it spits out dynamically generated pages. CGI allows you to point to an specific directory on your web server where executable scripts are found. So whenever someone visits your site those scripts are triggered by some application and the web server shows the results. But how does this works with PHP? Enter the mod_fcgi and the php-fpm modules.
Unlike the mod_php the mod_fcgi and the php-fpm work in a different way so instead of holding one process per request they handle several at a time. This is the broad picture. The result is higher performance, less memory usage and overall happiness.
Performance differences? Hell yes!. Prefork + mod_php runs 10 times slower than event_mpm + php-fpm, using Apache Workbench as the software test on bare metal. Please I beg you don’t take this statement as the holy truth. My “test” was simple. I fired two FreeBSD jails on bare metal (no accountable overhead here unlike with any other virtualization since you are hitting the same kernel as the host OS). They were configured to use prefork + mod_php one and mpm_event + php-fpm the other. I fired ten thousand requests for one hundred concurrent users. The safe thread mode jail (prefork + mod_php) lasted 475 seconds. The non-thread safe jail (event_mpm+ fpm) lasted “just” 43 seconds. The requests that were latest served didn’t even take one second. And none of them failed. What were the modules running? A simple php script or a fully fledged php application? They run the latest WordPress (4.6) plus the Genesis framework + one child theme crafted by the same developers. At least I did the test using real production software…
Now… which one to choose? Take your poison after reading some documentation. In the next few paragraphs you will find the needed configuration changes for each. And yes, you can only use one at a time.
Using the Apache Module
If you choose this option you will have to compile Apache to use the Prefork MPM module. Be aware of this. You will also have to decide with php version you are willing to use. At the time of writing there are three supported versions for php. I will put the latest at this time. Just remember it’s a matter of version number, nothing else.
Compile Apache with your desired option. To do so type:
cd /usr/ports/www/apache24
Once in configure your options by typing:
sudo make config
When finished install the software:
sudo make install clean BATCH=yes
Type the following commands:
whereis mod_php71
cd /usr/ports/www/mod_php71
sudo make config
sudo make install clean BATCH=yes
After some time compiling you will need to configure Apache by editing the main configuration file, the httpd.conf found in:
/usr/local/etc/apache24/httpd.conf
Make sure the following line is not commented out so the rule applies. It has to look something like:
LoadModule php71_module libexec/apache24/libphp71.so
Now it’s time to configure this module to play with Apache nicely. You will have to create a file in the following directory and add the following rules.
sudo vi /usr/local/etc/apache24/modules.d/010_mod_php.conf
Paste these rules in:
<IfModule php5_module>
    <IfModule dir_module>
        DirectoryIndex index.php
    </IfModule>
    <FilesMatch "\.(php|phtml|inc)$">
        SetHandler application/x-httpd-php
    </FilesMatch>
    <FilesMatch "\.phps$">
        SetHandler application/x-httpd-php-source
    </FilesMatch>
</IfModule>
As with using packages it is mandatory to add the apache entry into the /etc/rc.conf in order to use the service. As root type:
echo apache24_enable="YES" >> /etc/rc.conf
And after that, start the service so Apache starts working. If anything is wrong you will see that in the output. Again as root:
service apache24 onestart
You can check if the configuration rules are ok by typing:
apachectl configtest
Using FastCGI
If you plan to use this method mind two things. First compile Apache with the Worker MPM activated. But just before that remember to think about enabling suexec. Apache suEXEC is a feature of the Apache Web server. It allows users to run CGI and SSI applications as a different user. Usually all web server processes run as the default web server user like: wwwrun, www-data, Apache or nobody. The default in FreeBSD is www. If properly configured suexec permits to run CGI and SSI apps in a secure manner by these other users. To dig into this, read the following documentation.
If you chose to enable suexec remember to add this configuration rules into the /etc/make.conf file before compiling Apache.
.if ${.CURDIR:M*/www/apache24}
# SUEXEC will refuse to run CGI scripts if they are not in SUEXEC_DOCROOT.
# Set the following variable to the directory where your sites are.
# Or just set it "/" if to disable this security feature
SUEXEC_DOCROOT=/home
.endif
Compile Apache with your desired option. To do so type:
cd /usr/ports/www/apache24
Once in configure your options by typing:
sudo make config
When finished install the software:
sudo make install clean BATCH=yes
Now let’s look for that module and compile it. Type:
whereis mod_fcgid
cd /usr/ports/www/mod_fcgid
sudo make install clean BATCH=yes
After a while it would have been compiled. It’s time to configure this by edigint the main configuration file in Apache, the httpd.conf
sudo vi /usr/local/etc/apache24/httpd.conf
Make sure the following line appears and it is not commented out:
LoadModule fcgid_module libexec/apache24/mod_fcgid.so
If you have enabled SUEXEC you will also have to add the following rule (if present make sure it’s not commented out):
LoadModule suexec_module libexec/apache24/mod_suexec.so
Now we have set the right rules into the main configuration file, let’s configure the module itself by creating the following file:
sudo vi /usr/local/etc/apache24/modules.d/020_mod_fcgid.conf:
Add the following rules:
<IfModule fcgid_module>
    <IfModule dir_module>
        DirectoryIndex index.php
    </IfModule>

    <FilesMatch "\.(php|phtml|inc)$">
        Options +ExecCGI
        SetHandler fcgid-script
    </FilesMatch>

    # This should be less than or equal to PHP_FCGI_MAX_REQUESTS in php.fcgi
    FcgidMaxRequestsPerProcess 999

    # This should be equal to PHP's cgi.fix_pathinfo, which is 1 by default
    FcgidFixPathinfo 1

    # PHP's post_max_size, upload_max_filesize
    FcgidMaxRequestLen 200000000

    # PHP's max_execution_time, max_input_time
    FcgidBusyTimeout 600
    FcgidIdleTimeout 600
    FcgidIOTimeout 600
</IfModule>
To test this configuration you will have to use a CGI script. Let’s say the document root is located at /usr/local/www/apache24/data/example.com/public. We’ll create the CGI script in it by typing:
sudo vi /usr/local/www/apache24/data/example.com/cgi-bin/php.fcgi
And we’ll add the rules:
#!/bin/sh
PHP_FCGI_MAX_REQUESTS=10000
export PHP_FCGI_MAX_REQUESTS
exec /usr/local/bin/php-cgi
After this we have to change the file permissions to 755. Type:
sudo chmod 755 /usr/local/www/apache24/data/example.com/cgi-bin/php.fcgi
If we have chosen to use a different user to operate these scripts rather than the default apache user because we have enabled SUEXEC, we’ll have to change the ownership of the main directory. Type as follows:
sudo chown -R myuser:mygroup /usr/local/www/apache24/data/example.com
After this, we will configure a VirtualHost. To understand what a VirtualHost is read this article.
Add the following into the configuration file for that VirtualHost:
    <IfModule fcgid_module>
        FcgidWrapper "/home/example.com/cgi-bin/php.fcgi"
        <IfModule suexec_module>
            SuexecUserGroup myuser mygroup
        </IfModule>
    </IfModule>
As with using packages it is mandatory to add the apache entry into the /etc/rc.conf in order to use the service. As root type:
echo apache24_enable="YES" >> /etc/rc.conf
And after that, start the service so Apache starts working. If anything is wrong you will see that in the output. Again as root:
service apache24 onestart
You can check if the configuration rules are ok by typing:
apachectl configtest
Using the PHP-FPM module
If you choose this option, one of the fastest, you will have to compile Apache with the Event MPM flag enabled. This MPM option allows new requests to be processed by worker threads while the old requests are handled by listener threads. So first compile Apache accordingly.
Compile Apache with your desired option. To do so type:
cd /usr/ports/www/apache24
Once in configure your options by typing:
sudo make config
When finished install the software:
sudo make install clean BATCH=yes
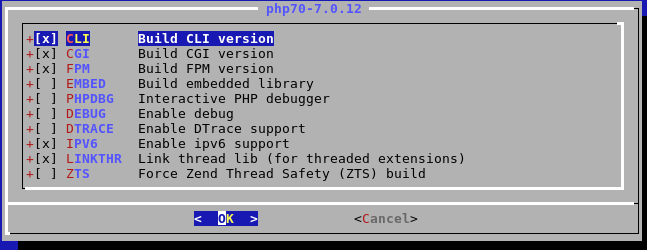
Once Apache has been compiled and installed you will have to install PHP with the php-fpm option enabled. At the time of writing there are three PHP versions supported. Look for one and install it. For the PHP 7.0 type:
whereis php70
cd /usr/ports/lang/php70
sudo make config

After setting the build the the FPM option enabled run the install by typing:
sudo make install clean BATCH=yes
Once Apache and PHP are installed let’s configure them to play nicely with each other. First we will edit the main configuration file for Apache, the httpd.conf file.
sudo vi /usr/local/etc/apache24/httpd.conf
We’ll make sure these two lines are present and are not commented out:
LoadModule proxy_module libexec/apache24/mod_proxy.so
LoadModule proxy_fcgi_module libexec/apache24/mod_proxy_fcgi.so
Now let’s introduce the module to Apache by adding this configuration file into the modules.d directory inside Apache.
sudo vi /usr/local/etc/apache24/modules.d/030_php-fpm.conf
And add the following lines:
<IfModule proxy_fcgi_module>
    <IfModule dir_module>
        DirectoryIndex index.php
    </IfModule>

    <FilesMatch "\.(php|phtml|inc)$">
        SetHandler "proxy:fcgi://127.0.0.1:9000"
    </FilesMatch>
</IfModule>
As with using packages it is mandatory to add the apache entry into the /etc/rc.conf in order to use the service. As root type:
echo apache24_enable="YES" >> /etc/rc.conf
And after that, start the service so Apache starts working. If anything is wrong you will see that in the output. Again as root:
service apache24 onestart
You can check if the configuration rules are ok by typing:
apachectl configtest
If you find the articles in Adminbyaccident.com useful to you, please consider making a donation.
Use this link to get $200 credit at DigitalOcean and support Adminbyaccident.com costs.
Get $100 credit for free at Vultr using this link and support Adminbyaccident.com costs.
Mind Vultr supports FreeBSD on their VPS offer.