You may have heard of the LAMP stack which stands for Linux, Apache, MySQL and PHP or Perl. This is the same but instead of using the GNU/Linux operating system we’ll use FreeBSD. This is the FAMP stack.
There are two ways to install software in FreeBSD, packages and the ports collections. Which in the GNU/Linux world is the equivalent of of binaries and self compiled binaries from original sources. Binaries are installed, search, etc through the pkg tool. The ports collection is a fine idea from the FreeBSD project to concentrate all the available software from sources and compile it through one tool. Compile software on your own can be interesting if the options the binary was compiled with do not satisfy your needs. But most of the time they will comply and there is no need to do so. It can take some time to compile all the software in use and any time you want to update you have to compile it all, again, making this a tedious task. FreeBSD also has a framework called Poudriere if you need to have your binaries compiled with your own options you can set a box dedicated to this task only. I will use packages in this article. Ports and Poudriere deserve their own articles.
This guide is not the holy grail whatsoever and supposes you have some knowledge on few things. One of those things is what a firewall is, what it does and some slight idea of networking. If you pretend to use this as a reference for a public facing website or web oriented service open to the internet at least do two things. First thing is setting ssh keys login only, as well as disabling the password login capacity (someone could not sniff your password but try some dictionary attacks or just discover it by trial an error or brute force it). Second is installing some kind of firewall and configuring it. If you have fallen into this page for whatever the reason and do not know anything about this (and want to know) visit the FreeBSD manual where you will find very descriptive yet short explanations on the basics.
If you find the articles in Adminbyaccident.com useful to you, please consider making a donation.
Use this link to get $200 credit at DigitalOcean and support Adminbyaccident.com costs.
Get $100 credit for free at Vultr using this link and support Adminbyaccident.com costs.
Mind Vultr supports FreeBSD on their VPS offer.
There is the zero step which is setting the repository to the latest packages. The default configuration is a bit conservative and you get packages for the quarterly period. You can avoid this step though. I prefer to use the latest instead which are usually quite recently build packages. They are not as up to date as if you use the ports collection but they usually have all the patches and are almost up to the latest version of the software in question. To set this configuration you have to edit the following file and change the word “quarterly” for “latest”.
root@famp:/home/albert # vi /etc/pkg/FreeBSD.conf
# $FreeBSD: releng/11.1/etc/pkg/FreeBSD.conf 320745 2017-07-06 17:22:33Z gjb $
#
# To disable this repository, instead of modifying or removing this file,
# create a /usr/local/etc/pkg/repos/FreeBSD.conf file:
#
# mkdir -p /usr/local/etc/pkg/repos
# echo "FreeBSD: { enabled: no }" > /usr/local/etc/pkg/repos/FreeBSD.conf
#
FreeBSD: {
url: "pkg+http://pkg.FreeBSD.org/${ABI}/latest",
mirror_type: "srv",
signature_type: "fingerprints",
fingerprints: "/usr/share/keys/pkg",
enabled: yes
}
First step on installing the FAMP stack: install the Apache web server. In FreeBSD 11 we still have the possibility to install Apache 2.2 and 2.4. If you use any Linux distribution there is a good chance you can only install the 2.4 version. Obviously the more modern the software the better but maybe you rely on the 2.2 version which is still supported. If that is your case you are probably compiling the software on your own. With FreeBSD you have both versions. This is also the case with different versions of MySQL, MariaDB and PHP, which are all precisely the case for the FAMP stack.
You will first look for the packages in question. So use the pkg command with the search option.
albert@famp:~ % pkg search apache2
apache22-2.2.34_1 Version 2.2.x of Apache web server with prefork MPM
apache24-2.4.29 Version 2.4.x of Apache web server
p5-Apache2-SOAP-0.73_4 Apache2 mod_perl2 SOAP Server
p5-Apache2-SiteControl-1.05_3 Perl web site authentication/authorization system
albert@famp:~ %
We’ll choose the latest, which is the 2.4 version.
albert@famp:~ % sudo pkg install apache24
Updating FreeBSD repository catalogue...
FreeBSD repository is up to date.
All repositories are up to date.
The following 10 package(s) will be affected (of 0 checked):
New packages to be INSTALLED:
apache24: 2.4.29
libnghttp2: 1.29.0
libxml2: 2.9.7
expat: 2.2.5
perl5: 5.24.3
pcre: 8.40_1
apr: 1.6.3.1.6.1
gdbm: 1.13_1
readline: 7.0.3_1
db5: 5.3.28_6
Number of packages to be installed: 10
The process will require 142 MiB more space.
33 MiB to be downloaded.
Proceed with this action? [y/N]: y
….
Once Apache has been installed we need to set a particular configuration file to start it up at boot time. This is the same for all software installed on FreeBSD. Unlike the SysV startup system used up until recently in some UNIX and GNU/Linux OS’s there are no run levels in FreeBSD. So in order to set installed software to fire at boot time one has to configure it adequately in the file /etc/rc.conf. There are two ways of doing this. One is by editing the file with your favourite editor. The other by using the sysrc tool.
By editing the file one may:
albert@famp:~ % sudo vi /etc/rc.conf
host_hostname="famp"
cron_flags="$cron_flags -J 15"
# Disable Sendmail by default
sendmail_enable="NONE"
sendmail_submit_enable="NO"
sendmail_outbound_enable="NO"
sendmail_msp_queue_enable="NO"
# Run secure syslog
syslogd_flags="-c -ss"
# Enable IPv6
ipv6_activate_all_interfaces="YES"
sshd_enable="YES"
apache24_enable="YES"
By using the sysrc tool (which is safer because it will display an error message if you miss type something or there is a mistake):
albert@famp:~ % sudo sysrc apache24_enable="YES"
apache24_enable: -> YES
albert@famp:~ %
After installing Apache and configuring the system to fire it up at boot time we’ll start it up and check if it works.
albert@famp:~ % sudo service apache24 onestart
Performing sanity check on apache24 configuration:
AH00557: httpd: apr_sockaddr_info_get() failed for famp
AH00558: httpd: Could not reliably determine the server's fully qualified domain name, using 127.0.0.1. Set the 'ServerName' directive globally to suppress this message
Syntax OK
Starting apache24.
AH00557: httpd: apr_sockaddr_info_get() failed for famp
AH00558: httpd: Could not reliably determine the server's fully qualified domain name, using 127.0.0.1. Set the 'ServerName' directive globally to suppress this message
albert@famp:~ %
A couple of errors appear since we haven’t configured Apache yet but it should be working. We can check this by using the ps command or apachectl.
albert@famp:~ % ps aux | grep httpd
root 3625 0.0 0.1 75968 4296 - SsJ 16:10 0:00.01 /usr/local/sbin/httpd -DNOHTTPACCEPT
www 3626 0.0 0.1 75968 4188 - IJ 16:10 0:00.00 /usr/local/sbin/httpd -DNOHTTPACCEPT
www 3627 0.0 0.1 75968 4188 - IJ 16:10 0:00.00 /usr/local/sbin/httpd -DNOHTTPACCEPT
www 3628 0.0 0.1 75968 4188 - IJ 16:10 0:00.00 /usr/local/sbin/httpd -DNOHTTPACCEPT
www 3629 0.0 0.1 75968 4188 - IJ 16:10 0:00.00 /usr/local/sbin/httpd -DNOHTTPACCEPT
www 3630 0.0 0.1 75968 4188 - IJ 16:10 0:00.00 /usr/local/sbin/httpd -DNOHTTPACCEPT
albert 3641 0.0 0.0 14828 1788 1 R+J 16:11 0:00.00 grep httpd
albert@famp:~ %
albert@famp:~ % sudo apachectl status
apache24 is running as pid 3625.
albert@famp:~ %
Finally we’ll check Apache is running correctly visiting the ip of the server where we should see some kind of message. In our case we should see: “It works!”.
Second step on installing the FAMP stack. Now we’ll install a MySQL database. It can be different versions from the original MySQL owned by Oracle or derivatives from original authors such as MariaDB or others like Percona. Choose your poison and enjoy. It doesn’t make a difference at install time so these instructions are equal for all.
The following command will display lots of packages related to MySQL. I’ve shortened the output just for clarity purposes. We just want to install de database, nothing else at this stage. As you can see we can install in January 2018 four different MySQL versions.
albert@famp:~ % pkg search mysql
……..
mysql55-client-5.5.58 Multithreaded SQL database (client)
mysql55-server-5.5.58 Multithreaded SQL database (server)
mysql56-client-5.6.38 Multithreaded SQL database (client)
mysql56-server-5.6.38 Multithreaded SQL database (server)
mysql57-client-5.7.20_2 Multithreaded SQL database (client)
mysql57-server-5.7.20_2 Multithreaded SQL database (server)
mysql80-client-8.0.2 Multithreaded SQL database (client)
mysql80-server-8.0.2 Multithreaded SQL database (server)
If we look for MariaDB:
albert@famp:~ % pkg search mariadb
mariadb-connector-c-3.0.2_1 MariaDB database connector for C
mariadb100-client-10.0.33 Multithreaded SQL database (client)
mariadb100-server-10.0.33 Multithreaded SQL database (server)
mariadb101-client-10.1.30 Multithreaded SQL database (client)
mariadb101-server-10.1.30 Multithreaded SQL database (server)
mariadb102-client-10.2.11 Multithreaded SQL database (client)
mariadb102-server-10.2.11_1 Multithreaded SQL database (server)
mariadb55-client-5.5.58 Multithreaded SQL database (client)
mariadb55-server-5.5.58 Multithreaded SQL database (server)
albert@famp:~ %
Lastly if we look for PerconaDB packages:
albert@famp:~ % pkg search percona
percona-monitoring-plugins-1.1.3_3 Cacti templates for MySQL, Apache, Memcached, and more by Percona
percona-pam-for-mysql-5.6.38.83.0_1 PAM plugin for MySQL
percona-toolkit-3.0.5 Collection of essential command-line utilities for MySQL
percona55-client-5.5.58.38.10 Multithreaded SQL database (client)
percona55-server-5.5.58.38.10 Multithreaded SQL database (server)
percona56-client-5.6.38.83.0 Multithreaded SQL database (client)
percona56-server-5.6.38.83.0 Multithreaded SQL database (server)
percona57-client-5.7.20.18 Multithreaded SQL database (client)
percona57-pam-for-mysql-5.7.20.18 PAM plugin for MySQL
percona57-server-5.7.20.18 Multithreaded SQL database (server)
albert@famp:~ %
Today I am more inclined towards MariaDB so this is what I will install.
albert@famp:~ % sudo pkg install mariadb102-server
Updating FreeBSD repository catalogue...
FreeBSD repository is up to date.
All repositories are up to date.
The following 5 package(s) will be affected (of 0 checked):
New packages to be INSTALLED:
mariadb102-server: 10.2.11_1
libedit: 3.1.20170329_2,1
unixODBC: 2.3.4
mariadb102-client: 10.2.11
libiconv: 1.14_11
Number of packages to be installed: 5
The process will require 241 MiB more space.
33 MiB to be downloaded.
Proceed with this action? [y/N]: y
Now as we did with the Apache web server we need to set the database to start up at boot time.
albert@famp:~ % sudo sysrc mysql_enable="YES"
mysql_enable: -> YES
albert@famp:~ %
We start up MariaDB.
albert@famp:~ % sudo service mysql-server onestart
Installing MariaDB/MySQL system tables in '/var/db/mysql' ...
OK
….
Starting mysql.
albert@famp:~ %
We now check it’s up and running.
albert@famp:~ % ps aux | grep mysql
mysql 3734 0.0 0.1 13180 2204 - IsJ 16:17 0:00.01 /bin/sh /usr/local/bin/mysqld_safe --defaults-extra-file=/var/db/mysql/my
mysql 3799 0.0 1.9 589844 80428 - IJ 16:17 0:00.33 /usr/local/libexec/mysqld --defaults-extra-file=/var/db/mysql/my.cnf --ba
albert 3833 0.0 0.0 14828 1860 1 R+J 16:21 0:00.00 grep mysql
albert@famp:~ %
And now we proceed with the proper install – deploy of the MariaDB database. Since it’s the first install we’ll set the database root password and we’ll answer the questions with the defaults (unless we need something else for some good reason).
albert@famp:~ % sudo mysql_secure_installation
NOTE: RUNNING ALL PARTS OF THIS SCRIPT IS RECOMMENDED FOR ALL MariaDB
SERVERS IN PRODUCTION USE! PLEASE READ EACH STEP CAREFULLY!
In order to log into MariaDB to secure it, we'll need the current
password for the root user. If you've just installed MariaDB, and
you haven't set the root password yet, the password will be blank,
so you should just press enter here.
Enter current password for root (enter for none):
OK, successfully used password, moving on...
Setting the root password ensures that nobody can log into the MariaDB
root user without the proper authorisation.
Set root password? [Y/n] y
New password:
Re-enter new password:
Password updated successfully!
Reloading privilege tables..
... Success!
By default, a MariaDB installation has an anonymous user, allowing anyone
to log into MariaDB without having to have a user account created for
them. This is intended only for testing, and to make the installation
go a bit smoother. You should remove them before moving into a
production environment.
Remove anonymous users? [Y/n]
... Success!
Normally, root should only be allowed to connect from 'localhost'. This
ensures that someone cannot guess at the root password from the network.
Disallow root login remotely? [Y/n]
... Success!
By default, MariaDB comes with a database named 'test' that anyone can
access. This is also intended only for testing, and should be removed
before moving into a production environment.
Remove test database and access to it? [Y/n]
- Dropping test database...
... Success!
- Removing privileges on test database...
... Success!
Reloading the privilege tables will ensure that all changes made so far
will take effect immediately.
Reload privilege tables now? [Y/n]
... Success!
Cleaning up...
All done! If you've completed all of the above steps, your MariaDB
installation should now be secure.
Thanks for using MariaDB!
albert@famp:~ %
Third step in the FAMP stack install. The P letter on this stack usually stands for the PHP language. On FreeBSD there are several versions to choose from. On January 2018 these are the ones: php56, php70, php71, and php72.
We’ll go for the latest one. (Be aware some software may depend on some specific php version. That is the case for Nagios 4, which defaults on php56. However you may find performance improvements using php72 for example if you use WordPress. You can also compile your third party software using the ports collection provided in FreeBSD or even set your own repository using Poudriere. This kind of setup is out of this article’s scope).
albert@famp:~ % sudo pkg install php72
Updating FreeBSD repository catalogue...
FreeBSD repository is up to date.
All repositories are up to date.
The following 2 package(s) will be affected (of 0 checked):
New packages to be INSTALLED:
php72: 7.2.0_1
libargon2: 20161029_1
Number of packages to be installed: 2
The process will require 24 MiB more space.
3 MiB to be downloaded.
Proceed with this action? [y/N]: y
[famp] [1/2] Fetching php72-7.2.0_1.txz: 100% 3 MiB 51.6kB/s 01:07
[famp] [2/2] Fetching libargon2-20161029_1.txz: 100% 56 KiB 57.6kB/s 00:01
Checking integrity... done (0 conflicting)
[famp] [1/2] Installing libargon2-20161029_1...
[famp] [1/2] Extracting libargon2-20161029_1: 100%
[famp] [2/2] Installing php72-7.2.0_1...
[famp] Extracting php72-7.2.0_1: 100%
albert@famp:~ %
Now the PHP language has been installed but we need some extras, like the module for it to “talk” to the Apache web server as well as the database connectors. Otherwise we won’t be making the use of the FAMP stack since the programs wouldn’t be interacting between them.
But first we’ll configure php. It’s just one line. That file controls the general behaviour of PHP so bare in mind to do this.
albert@famp:~ % sudo cp /usr/local/etc/php.ini-production /usr/local/etc/php.ini
albert@famp:~ %
Fourth step on the FAMP stack installation. Now we’ll install the missing modules. First the one to talk to the Apache web server.
albert@famp:~ % sudo pkg install mod_php72-7.2.0_1
Updating FreeBSD repository catalogue...
FreeBSD repository is up to date.
All repositories are up to date.
The following 1 package(s) will be affected (of 0 checked):
New packages to be INSTALLED:
mod_php72: 7.2.0_1
Number of packages to be installed: 1
The process will require 5 MiB more space.
1 MiB to be downloaded.
Proceed with this action? [y/N]: y
[famp] [1/1] Fetching mod_php72-7.2.0_1.txz: 100% 1 MiB 404.7kB/s 00:03
Checking integrity... done (0 conflicting)
[famp] [1/1] Installing mod_php72-7.2.0_1...
[famp] Extracting mod_php72-7.2.0_1: 100%
[activating module `php7' in /usr/local/etc/apache24/httpd.conf]
Message from mod_php72-7.2.0_1:
***************************************************************
Make sure index.php is part of your DirectoryIndex.
You should add the following to your Apache configuration file:
<FilesMatch "\.php$">
SetHandler application/x-httpd-php
</FilesMatch>
<FilesMatch "\.phps$">
SetHandler application/x-httpd-php-source
</FilesMatch>
*********************************************************************
If you are building PHP-based ports in poudriere(8) with ZTS enabled,
add WITH_MPM=event to /etc/make.conf to prevent build failures.
*********************************************************************
albert@famp:~ %
As you can see the installation also contains a message in order to use the module correctly. We’ll have to edit the main configuration file for Apache. Here you’ll find it:
albert@famp:/usr/local/etc/apache24 % pwd
/usr/local/etc/apache24
albert@famp:/usr/local/etc/apache24 %
The file in question is httpd.conf.
albert@famp:/usr/local/etc/apache24 % ll
total 117
drwxr-xr-x 2 root wheel 3 Jan 3 18:45 Includes/
drwxr-xr-x 2 root wheel 2 Jan 3 18:45 envvars.d/
drwxr-xr-x 2 root wheel 26 Jan 3 18:45 extra/
-rw-r--r-- 1 root wheel 21031 Jan 6 17:12 httpd.conf
-rw-r--r-- 1 root wheel 20973 Dec 21 02:50 httpd.conf.sample
-rw-r--r-- 1 root wheel 13077 Dec 21 02:50 magic
-rw-r--r-- 1 root wheel 13077 Dec 21 02:50 magic.sample
-rw-r--r-- 1 root wheel 60847 Dec 21 02:50 mime.types
-rw-r--r-- 1 root wheel 60847 Dec 21 02:50 mime.types.sample
drwxr-xr-x 2 root wheel 3 Jan 3 18:45 modules.d/
albert@famp:/usr/local/etc/apache24 %
We’ll back it up first. Just in case. By the way, do this any time you touch something, we’ll be saving your ass and maybe someone else’s too.
albert@famp:/usr/local/etc/apache24 % sudo cp httpd.conf httpd.conf.original
albert@famp:/usr/local/etc/apache24 %
Let’s edit now. We have to look for a specific part, where the Dir module is set. Unlike some Linux distributions this file contains all the main configuration rules for Apache. On Debian for example this file is split into different files on different directories. For some the Debian and derivatives approach is better. For others that is simply not the case. I prefer to have everything on one file, it’s clearer. At the end of the day it’s a matter of taste and costume.
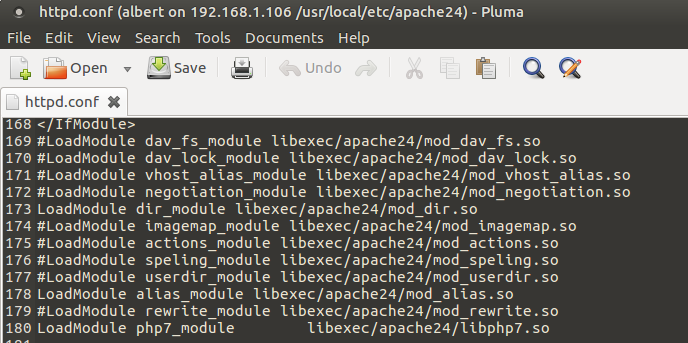
As you can see the recently installed module, the mod_php72 sets a line (180) automatically:

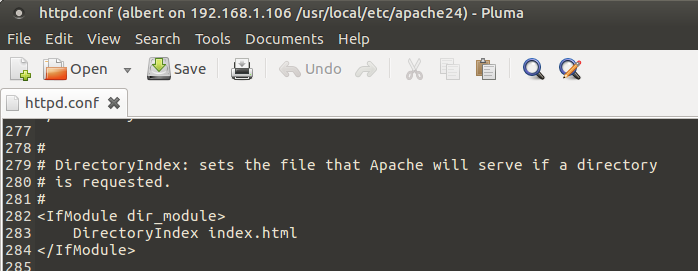
But we are looking for another one. Specifically the DirectoryIndex entry:

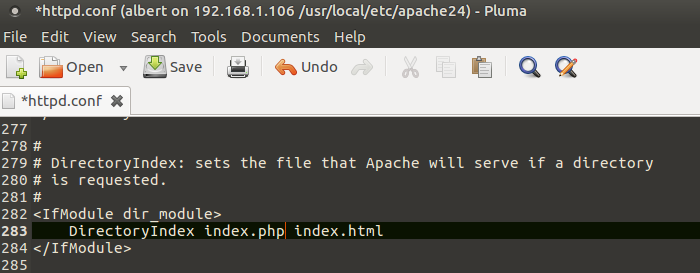
It should look like so by adding index.php between DirectoryIndex and index.html:

We’ll edit with with the vi editor. You can do the same with your editor of choice, nano, vim, whatever.
albert@famp:/usr/local/etc/apache24 % sudo vi +283 httpd.conf
#
# DirectoryIndex: sets the file that Apache will serve if a directory
# is requested.
#
<IfModule dir_module>
DirectoryIndex index.php index.html
</IfModule>
Now we have to add those configuration lines, the ones allowing Apache “to speak” PHP. Many tutorials explain to include those at the bottom of the file, our you can be a bit smarter and include them on the module they are intended for. There is even a better way. All of them work but you know taste, readability, work-flow, sanity… do also matter.
If you go into the modules.d directory you will find an interesting approach on adding configurations for third party modules, software, etc. Use them accordingly. I paste the README:
albert@famp:/usr/local/etc/apache24 % cd modules.d
albert@famp:/usr/local/etc/apache24/modules.d % ll
total 5
-rw-r--r-- 1 root wheel 447 Dec 21 02:50 README_modules.d
albert@famp:/usr/local/etc/apache24/modules.d % cat README_modules.d
# ===================================================
# Directory for third party module config files.
#
# Modules can be disabled by adding a '#' in front
# of the "LoadModule" line e.g. "#LoadModule"
#
# Files are automatically included if the name
# begins with a three digit number followed by '_'
# and ending in '.conf' e.g. '080_mod_php.conf'
#
# Maintainers can also include instructions how to
# use the module (instead pkg-message).
#
albert@famp:/usr/local/etc/apache24/modules.d %
We’ll place our module in here using the lines he had to add for the PHP language. Use your editor to get something like this:
albert@famp:/usr/local/etc/apache24/modules.d % cat 001_mod_php.conf
<FilesMatch "\.php$">
SetHandler application/x-httpd-php
</FilesMatch>
<FilesMatch "\.phps$">
SetHandler application/x-httpd-php-source
</FilesMatch>
albert@famp:/usr/local/etc/apache24/modules.d %
Since we have altered the Apache configuration it is still running using the old rules. We’ll have to restart it. Before we do that we can check if there are syntax errors.
albert@famp:/usr/local/etc/apache24/modules.d % sudo apachectl configtest
Performing sanity check on apache24 configuration:
AH00557: httpd: apr_sockaddr_info_get() failed for famp
AH00558: httpd: Could not reliably determine the server's fully qualified domain name, using 127.0.0.1. Set the 'ServerName' directive globally to suppress this message
Syntax OK
albert@famp:/usr/local/etc/apache24/modules.d %
It complains because of two things, that you will fix afterwards, depending of your needs (probably some web thing), but syntax is ok to go. We now do a graceful restart.
albert@famp:/usr/local/etc/apache24/modules.d % sudo apachectl graceful
Performing sanity check on apache24 configuration:
AH00557: httpd: apr_sockaddr_info_get() failed for famp
AH00558: httpd: Could not reliably determine the server's fully qualified domain name, using 127.0.0.1. Set the 'ServerName' directive globally to suppress this message
Syntax OK
Performing a graceful restart
AH00557: httpd: apr_sockaddr_info_get() failed for famp
AH00558: httpd: Could not reliably determine the server's fully qualified domain name, using 127.0.0.1. Set the 'ServerName' directive globally to suppress this message
albert@famp:/usr/local/etc/apache24/modules.d %
Now the final step for PHP. We are going to test if php files are correctly parsed into Apache and therefore correctly displayed on a web browser.
albert@famp:~ % sudo vi /usr/local/www/apache24/data/info.php
<?php phpinfo(); ?>
albert@famp:~ %
We’ll now go to our browser and check our server’s ip address and look for the file we just added. In my case: http://192.168.1.106/info.php. This is how it looks:

As you can see PHP is working correctly with apache. Just remember to eliminate this info.php file so no one can access your configuration.
albert@famp:~ % sudo rm /usr/local/www/apache24/data/info.php
albert@famp:~ %
To end this tutorial the fifth step in the FAMP stack installation we’ll install the modules connecting PHP and MariaDB (they are the same as the ones for MySQL or PerconaDB). It is quite sure you will run some PHP application that needs to write/retrieve some data from a database.
albert@famp:~ % sudo pkg install php72-mysqli
Updating FreeBSD repository catalogue...
FreeBSD repository is up to date.
All repositories are up to date.
The following 1 package(s) will be affected (of 0 checked):
New packages to be INSTALLED:
php72-mysqli: 7.2.0_1
Number of packages to be installed: 1
39 KiB to be downloaded.
Proceed with this action? [y/N]: y
[famp] [1/1] Fetching php72-mysqli-7.2.0_1.txz: 100% 39 KiB 40.0kB/s 00:01
Checking integrity... done (0 conflicting)
[famp] [1/1] Installing php72-mysqli-7.2.0_1...
[famp] Extracting php72-mysqli-7.2.0_1: 100%
albert@famp:~ %
So this is all for the FAMP stack installation. There are some other configurations for Apache and PHP. For example if you want to use the php-fpm module which is faster that the mod_php one the install is a bit different. I will cover that part on another article. I hope you find this one helpful.
Update 05-2020: You can get automatic install scripts for the FAMP stack in a dedicated Adminbyaccident Github repository.
If you find the articles in Adminbyaccident.com useful to you, please consider making a donation.
Use this link to get $200 credit at DigitalOcean and support Adminbyaccident.com costs.
Get $100 credit for free at Vultr using this link and support Adminbyaccident.com costs.
Mind Vultr supports FreeBSD on their VPS offer.