
There are other guides on how to do this on Windows, Mac, but not on FreeBSD, so here goes a how to pfSense on Virtualbox running on FreeBSD. Before going to it, let’s address the first question, which is what is pfSense.
pfSense is a FreeBSD based distribution made for networking purposes. The company behind it is called Netgate, and they sell very interesting hardware appliances for networking, comparable to those of Cisco, Juniper (also based on FreeBSD), F5, or Palo Alto. pfSense is not limited to firewalling but VPN connections, routing, IPSEC tunneling, bridging, load balancing, DHCP, DNS, failover, SNMP, NAT, traffic shaping, deep packet inspection, intrustion detection capabilities are also included and not limited to. Take a look at the features page from Netgate and you will get the whole list.
What can be done with pfSense? Aside of building your own home’s router/firewall to replace your ISP provider one with another hardened by you, it can be used in a corportate using Netgate’s hardware or other appliances, using x86-64 hardware or ARM based ones. Choose your poison, although I’d recommend Netgate’s ones to get the full package and professional support if this is going to be used in a corporate environment.
If you find the articles in Adminbyaccident.com useful to you, please consider making a donation.
Use this link to get $200 credit at DigitalOcean and support Adminbyaccident.com costs.
Get $100 credit for free at Vultr using this link and support Adminbyaccident.com costs.
Mind Vultr supports FreeBSD on their VPS offer.
To test pfSense a VirtualBox VM may suffice. On a Windows system or Mac, even Linux, there are some guides elsewhere. Similar principles apply so you can read this how to test pfSnese on VirtualBox running on FreeBSD and apply the same concepts in those systems.
List of pre-requisites:
1.- A PC running FreeBSD as a desktop (Windows, macOS or GNU/Linux can substitute FreeBSD).
2.- At least 8 GB or RAM.
3.- VirtualBox installed.
4.- A pfSense image, for x86-64 architecture, already downloaded. Link here.
5.- Some UNIX/Linux, VirtualBox usage and systems knowledge.
6.- This guide.
Steps in this guide.
0.- Configure a FreeBSD desktop PC box to clone the NIC and bridge networks.
1.- Configure the VM.
2.- Install pfSense in the VM.
3.- Configure pfSense.
Basic concepts to be known before going into it, explained with a five year old child in mind. For accuracy click on the links.
WAN. Stands for Wide Area Network. Think of the internet out of your house. But your house is also identified with an external ip, like the number of your house in a street.
LAN. Local Area Network. The network inside your home, emanating from your ISP’s router, your office network at your job. Simply put, a small network, which has internet connection through one device.
NIC. Network Interface Controller. The place you plug ‘the internet cable’, it looks like a ‘telephone’ cable, but it probably is an RJ45.
IP address. Computers ‘talk’ to each other through routers. In order to get an identification, ip’s are used. And they are composed by numbers and sometimes a combination with letters, not fancy names. Your router at home has an WAN address, therefore an external IP, and several internal IP’s, published in the LAN (inside your house/office).
Bridging. Joining two separate networks.
0.- Configure a FreeBSD desktop PC box to clone the NIC and bridge networks.
Because we want to test pfSense in a test environment, that means not hitting the internet directly, and using our workstation pc, we’ll use VirtualBox. Other virtualization products can be used, the concepts apply the same.
Our FreeBSD desktop (read Windows, macOS, Linux as well) probably has only one network interface (from now on NIC). This is an issue because pfSense needs two ip addresses, one for a WAN and a second one for the LAN. Each has to have its own NIC. And our PC has only one NIC. To further complicate things, those two ips can’t be on the same range (eg: can’t be 192.168.1.10 for WAN and again 192.168.1.xx for the LAN it should be for example 172.16.1.10 for the LAN). That is they can’t be at the same street building, they must be on different streets, to have a real world analogy. How to solve this?
Enter cloning interfaces and bridging. FreeBSD allows interface cloning. Therefore you can duplicate an interface. The trick in this case is not cloning the loopback interface (namely lo0, or also identified by its address 127.0.0.1) but to ‘clone’ a bridge and use that NIC as the secondary one. It sounds crazy but it works.
As the FreeBSD handbook explains there is a kernel module that enables bridging. What we need to do is create a bridge, use the cloned_interface entry to get the second NIC, give it an IP address and et voilá! you can then have a second NIC pointing to an ip address of a different range.
First you will find the instructions on how to perform this once and later the instructions to make this bridging permanent, so you don’t lose it after reboots.
As the ‘zero’ step we’ll make sure the bridging module on the kernel is loaded.
[user@system ~]$ kldstat | grep bridge
35 1 0xffffffff83e40000 5fb8 if_bridge.ko
36 1 0xffffffff83e46000 3b78 bridgestp.ko
[user@system ~]$
The modules are loaded. In case they weren’t, you can load them manually like so:
sudo kldload if_bridge
sudo kldload bridgestp
Temporary bridging instructions.
Now, first create the bridge like so:
[user@system ~]$ sudo ifconfig bridge create
Password:
bridge0
[user@system ~]$
Then check it exists by issuing the ifconfig command.
[user@system ~]$ ifconfig
#### ommitted output with the other interfaces found in the system ####
bridge0: flags=8802<BROADCAST,SIMPLEX,MULTICAST> metric 0 mtu 1500
ether 02:2f:7d:a4:79:01
options=9<PERFORMNUD,IFDISABLED>
groups: bridge
id 00:00:00:00:00:00 priority 32768 hellotime 2 fwddelay 15
maxage 20 holdcnt 6 proto rstp maxaddr 2000 timeout 1200
root id 00:00:00:00:00:00 priority 0 ifcost 0 port 0
[user@system ~]$
Bring the interface up.
[user@system ~]$ sudo ifconfig bridge1 up
[user@system ~]$
Give the interface an ip belonging to the desired range.
[user@system ~]$ sudo ifconfig bridge1 172.16.0.100/24
[user@system ~]$
If you don’t want to make this permanent just jump to the point 1 steps. As a foot note mind the bridge0 interface has an ip, but there is no device yet able to communicate to the internet. The VM will do that for us.
Permanent bridging instructions.
First create the bridge like so:
[user@system ~]$ sudo ifconfig bridge create
Password:
bridge0
[user@system ~]$
Then check it exists by issuing the ifconfig command.
[user@system ~]$ ifconfig
#### ommitted output with the other interfaces found in the system ####
bridge0: flags=8802<BROADCAST,SIMPLEX,MULTICAST> metric 0 mtu 1500
ether 02:2f:7d:a4:79:01
options=9<PERFORMNUD,IFDISABLED>
groups: bridge
id 00:00:00:00:00:00 priority 32768 hellotime 2 fwddelay 15
maxage 20 holdcnt 6 proto rstp maxaddr 2000 timeout 1200
root id 00:00:00:00:00:00 priority 0 ifcost 0 port 0
[user@system ~]$
Bring the interface up.
[user@system ~]$ sudo ifconfig bridge1 up
[user@system ~]$
Edit the /etc/rc.conf file to add the interface and its ip address. To do so include the following lines in the file:
cloned_interfaces="bridge0"
ifconfig_bridge0="inet 172.16.0.100 netmask 255.255.255.0"
defaultrouter="172.16.0.15"
Reload the network service by issuing:
sudo service netif restart
Check the bridge has the desired ip, in this example ‘ 172.16.0.100’.
[user@system ~]$ ifconfig
#### ommitted output with the other interfaces found in the system ####
bridge0: flags=8843<UP,BROADCAST,RUNNING,SIMPLEX,MULTICAST> metric 0 mtu 1500
ether 02:2f:7d:a4:79:01
inet 172.16.0.100 netmask 0xffffff00 broadcast 172.16.0.255
nd6 options=9<PERFORMNUD,IFDISABLED>
groups: bridge
id 00:00:00:00:00:00 priority 32768 hellotime 2 fwddelay 15
maxage 20 holdcnt 6 proto rstp maxaddr 2000 timeout 1200
root id 00:00:00:00:00:00 priority 32768 ifcost 0 port 0
[user@system ~]$
Now we know we’ve cloned the interface. Time to get into VirtualBox and create the VM.
1.- I will avoid the whole process of creating a VM in VirtualBox here, first because if you are at this point you have already done this, and if not, trust me, it’s very easy and intuitive. Just select the default options to create the VM, selecting FreeBSD as the OS (remember pfSense is FreeBSD based), at least 1GB or RAM.
Once you have the VM created, before launching it, we’ll make some configuration changes in the Network settings so we get what we need for the VM to work and have internet access, as well as we have connectivity to the pfSense web interface.
First, for those who’ve never done this. Add the pfSense iso file you’ve previously downloaded (this was a pre-requisite, remember?). The following pics are in my default locale, and where you see the catalan word for ‘Emmagatzematge’ you will read ‘Storage’ if you are using English.
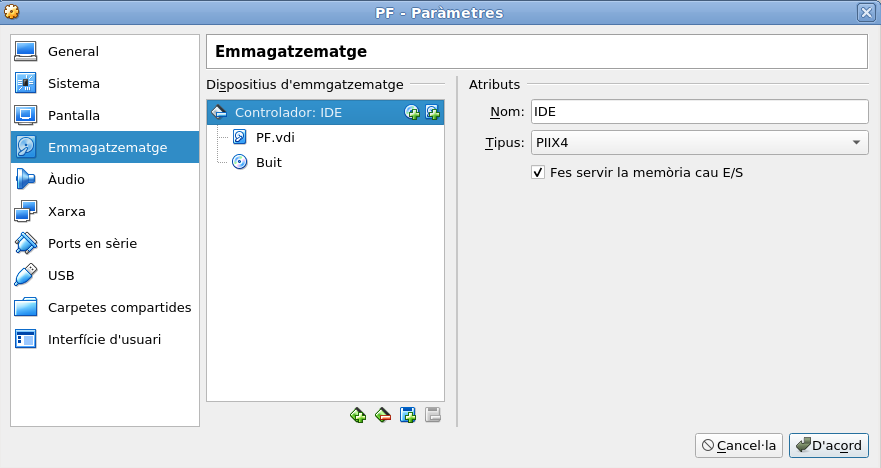
Click on the plus sign, found at the ‘Controller: IDE’ line, and search for the pfSense iso you downloaded in the correspondent folder.
1.- Configure the VM.
Once you’ve added the .iso file it’s time to properly configure the network. In my settings you will read ‘Xarxa’ which is the catalan word for network.
You will find the next settings by default:
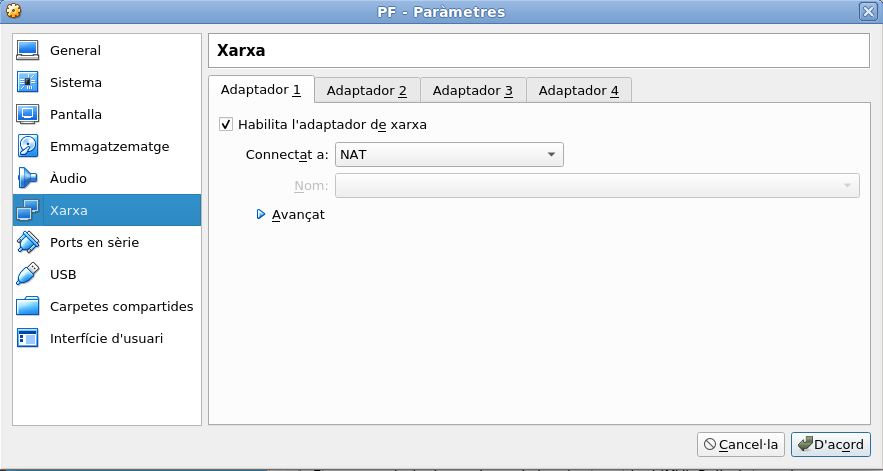
We must change Adapter 1 to ‘Bridged network’.
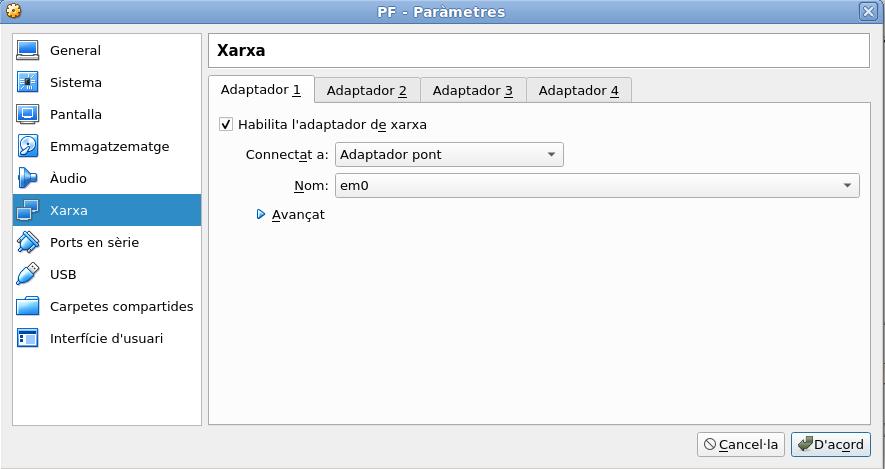
As you can see the name of the NIC is em0.
Now we will move to the second tab, where we can read ‘Adapter 2’ and we will enable the adapter and choose another setting. This time around we will select again the ‘Bridge’ but instead of choosing the ‘em0’ NIC, click on the menu and select… you previously created and named bridge0.
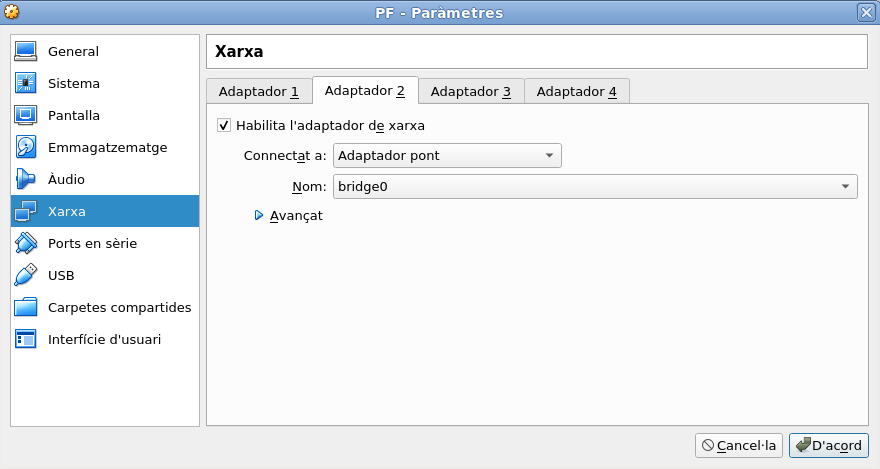
Safe these settings and we’re ready to go. Before stepping into the next part of this how to test pfSnese on VirtualBox running on FreeBSD, we need to address a few whys.
Again, as already mentioned in the introduction, pfSense needs to have two ip addresses, one for the WAN (exterior) and one for the LAN (interior) sides of it. Running on the same range is not an option, since this could lead to a packet collision, a distortion of who is in charge of what. So on the first adapter we’ve chosen the bridge for the NIC em0. This will contact our home/office network and will probably get an ip from our home/office router automatically. It is quite possible it’d be something like 192.168.1.110. That will be the WAN for pfSense. For the second adapter though we’ve chosen the bridge0 NIC, that interface we created before. We’ll give that a different range, as we chose before, something inside the 172.16.0.xx range.
This way we can achieve our goals, leave untouched our normal interface, not having to fiddle with our home/office router, at the same time we get a WAN ip on one range and a LAN ip on a different one. Simple.
2.- Install pfSense in the VM.
This process is quite simple, specially if you’ve used MS-DOS and other old-fashion installers. For the more modern individuals, don’t use your mouse, just your keyboard, specially your arrow keys.
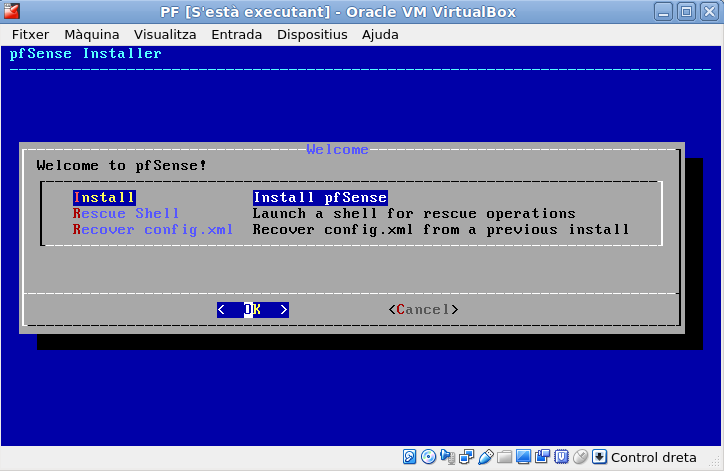
After accepting the license, select install and go ahead.
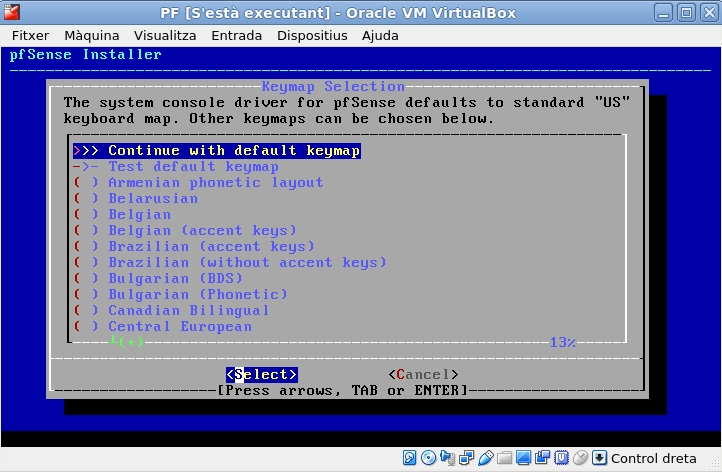
Select your keyboard language.
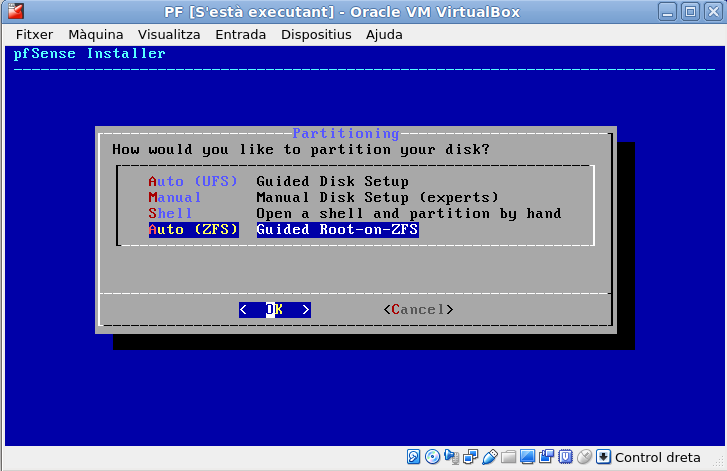
Select the file system type. For small RAM devices, select the first option, UFS. For one gigabyte of RAM or superior (our case) select ZFS, the fourth option.
Select now, the disks layout. Because we’re only using one, just go ahead and ‘Proceed with the installation’.
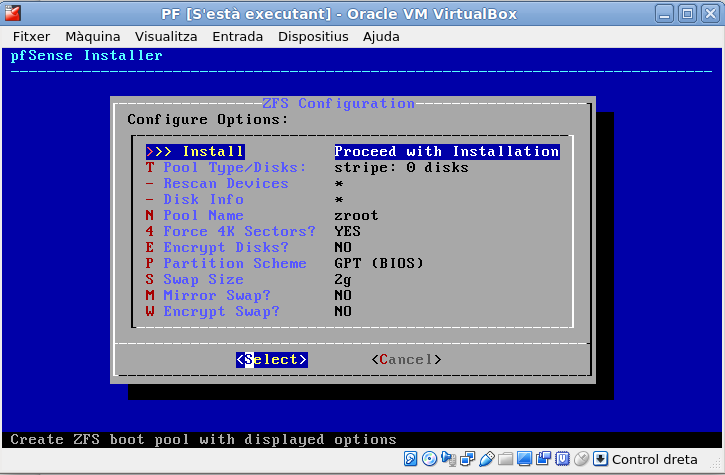
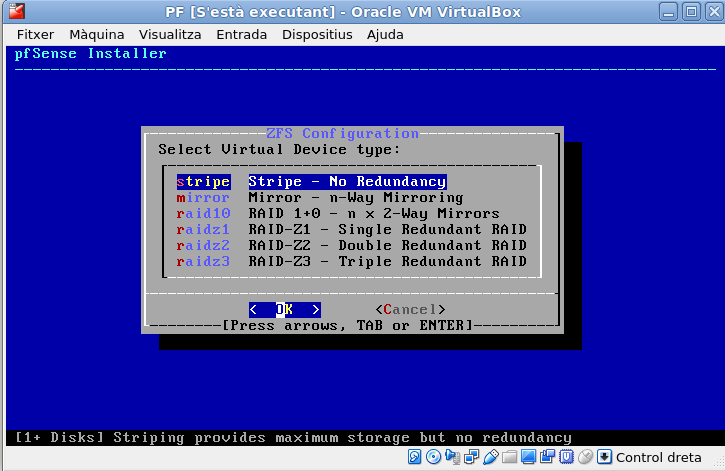
More disk layout. Since it’s only one disk, select ‘stripe’.
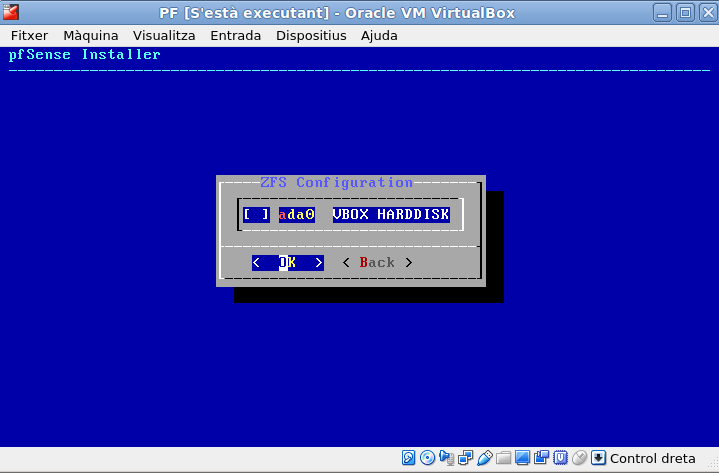
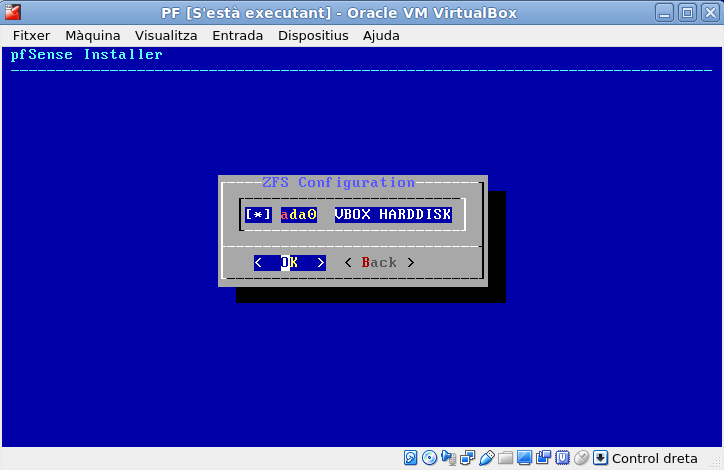
To select the next option, press the space bar, and a ‘*’ will appear in the selected blank. Those my age an older will already know this. Younger generations may not.
Before:
And after:
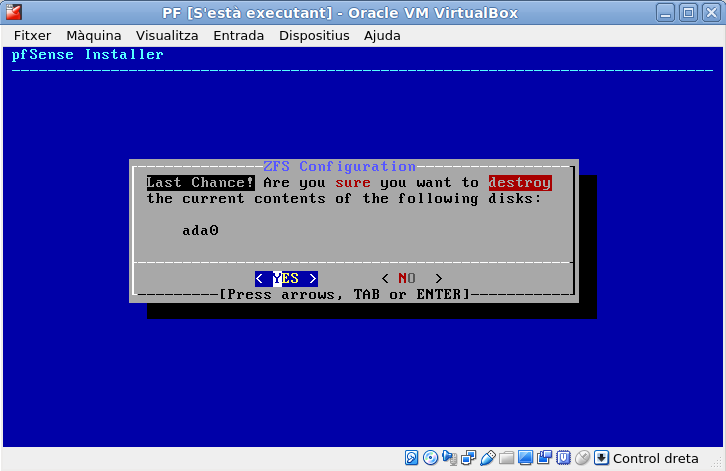
Press your left arrow and select ‘YES’ to confirm the last install step.
Once installed it will ask us if we want to make further modifications before reboot. We’ll select the default which is not to do any.
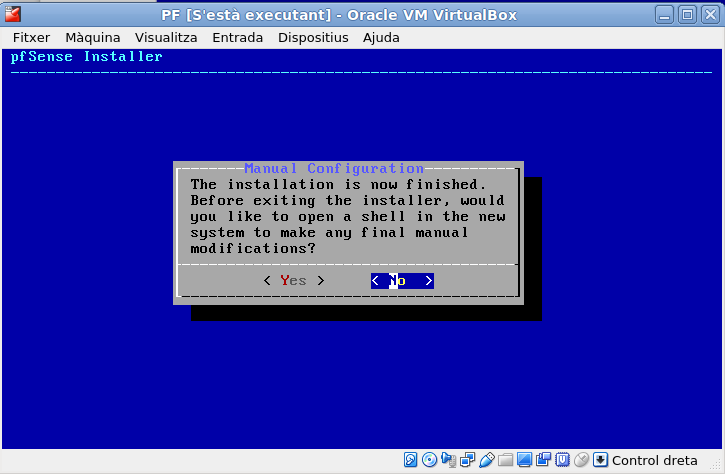
Now, when we reboot the system we will have to make sure at boot time the .iso disk file is not attached to the VM. I typically do this on the fly when it’s just starting up, before the bootloader comes in, by being fast with the mouse and the menu above. Select ‘Devices’, navigate on the first option ‘Optical devices’, and you’ll see two IDE devices. Make sure you uncheck the pfSense iso file when booting back. If you reboot and the installation process starts again, don’t worry. Close the VM, go to settings, remove the iso file, and boot back again. You won’t break anything.
The VM is now installed. Let’s go for the next step in this how to test pfSnese on VirtualBox running on FreeBSD.
3.- Configure pfSense.
Booting back, we’ll be prompted to a CLI environment with a few options. The most important bit now is looking at the ips given to the WAN and LAN interfaces.

As as you can see the world is not perfect and at install time the LAN took an address in the 192.168.1.xxx range. What to do? Let’s use the menu. Option 2 for us now.
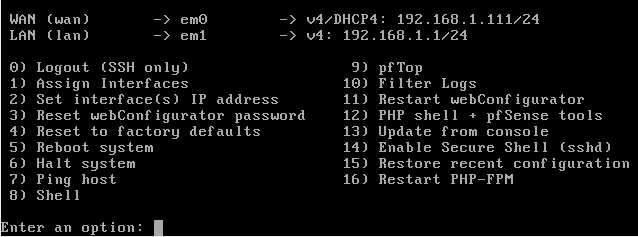
Once we selected option2, let’s select the second option of what we are presented with, so we can give a new IP to the LAN, em1 NIC.

As we said before, we have to assign an address within the range of the cloned interface (bridge0), and that falls into something in the 172.16.0.xxx range. I’ve chosen this:
![]()
We’re now asked for a subnet. Just put 24 here and don’t think about it anymore at this point in time. After you’ve gained knowledge with networking and the tool you will understand better.

Since we are in a LAN just type enter at the next prompt.

No IPv6 here, so leave this blank also and just type enter.
![]()
Say yes, you want the DHCP server on. This will give other VM’s you select the bridge0 interface an ip address within the selected range.
![]()
We’re now asked for the full range of ip’s this DHCP server will work with. I’ll give it a wide range but you can make it tighter. Remember your bridge0 interface is bound to the 172.16.0.100 and the pfSense VM will be serving ips from the 172.16.0.15, wo make sure the selected range covers this at least.
![]()
Now, we’re told the IPv6 DHCP service is not enabled, and this is right because we only need IPv4 addresses. And we are asked to use the pfSense interface in the port 80, which is http, instead of port 443, which is https. Say NO. I beg you.
![]()
You select no, because otherwise anyone in your network, could sniff the traffic between you and the pfSense web interface and see your configurations, etc. And that is malicious activity.
We are now told everything is fine and if we want to go to the web configurator for pfSense, we have an ip address for us ready to go.

See? We’ve achieved it. WAN interface on the 192.168.1.xxx range and the LAN interface on a different range, for us 172.16.0.15.

3.- Configure pfSense.
Last step on this how to test pfSnese on VirtualBox running on FreeBSD. We will now grab our favourite browser and go the the mentioned ip. Let’s visit:
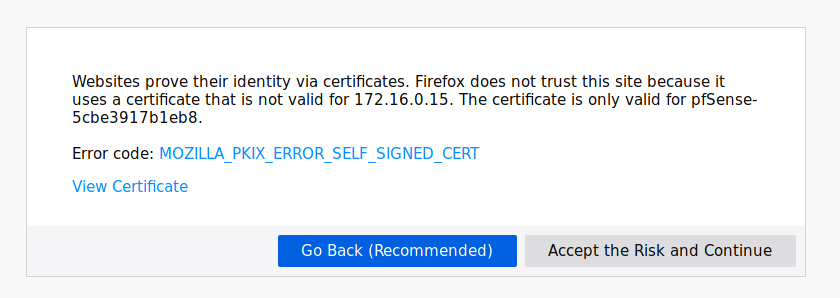
Don’t panic. The warning message is related to the https connection. Because we’re using a self signed certificate the browser complains like a maniac. But we are ok. Again, this is safer than selecting http instead of https. With an http connection information travels in plain text, passwords too. With an https connection the information travels encrypted. If we now make this certificate permanent in our browser the warning will disappear and the information between us and the VM web interace will be encrypted and no one will be able to sniff on it.
So, yes, no one will scape alive of this life. But keep calm, ok?
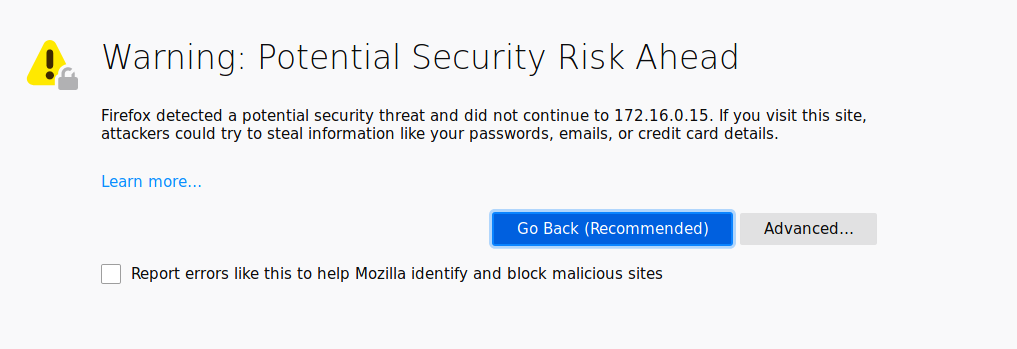
Click on ‘Advanced’.
And yes, the seven plagues will come to your land if you click on ‘Accept the Risk’ but that is what we want.
So if everything is right we should be presented with something like:
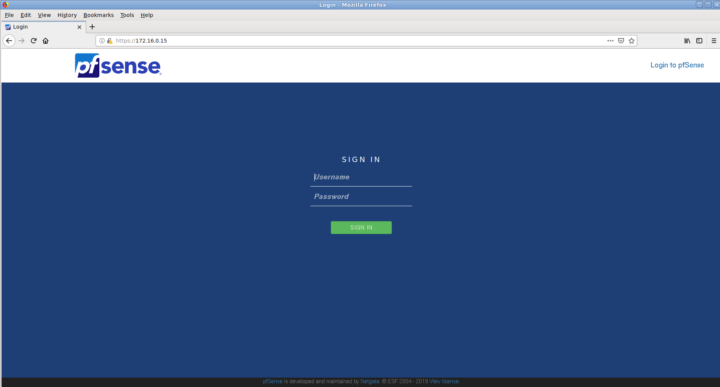
Username: admin
Password: pfsense
You will change the password later.
Once logged in we’re presented with a few setup screens.
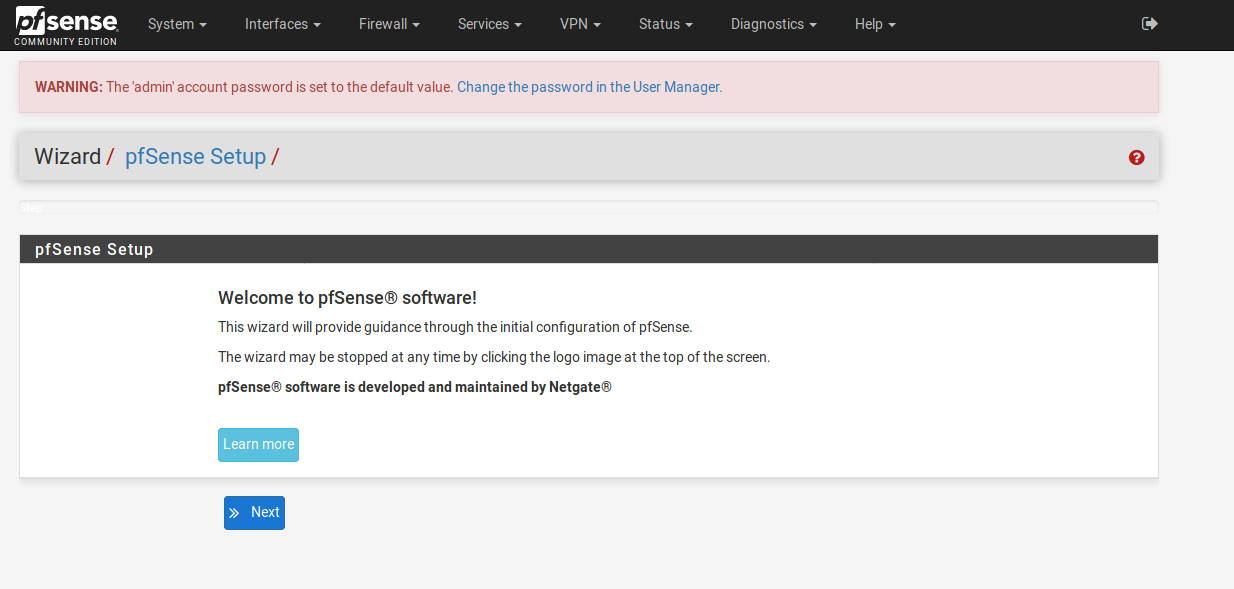
We’ll click on ‘Next’. Twice, because the following screen is about obtaining support, and we are just testing the tool by now. Handy prompt, though, whenever you are doing an install for your network or a client’s one, and you’ve bought support.
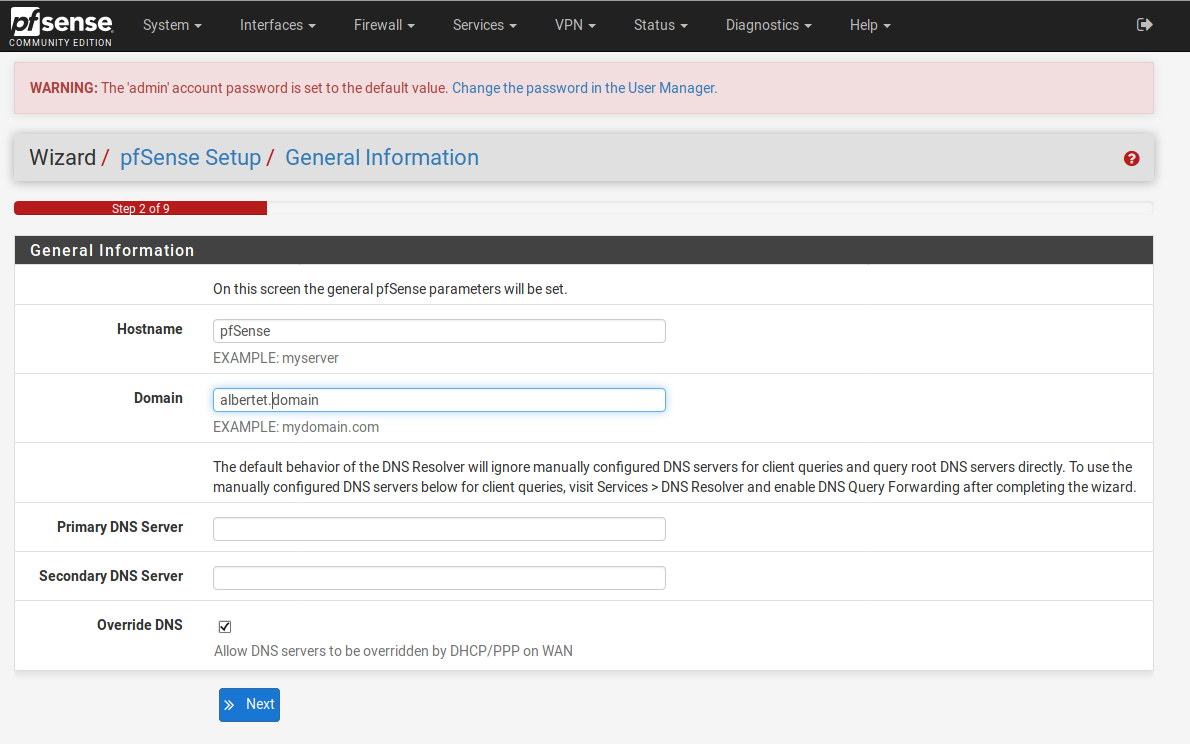
The next prompt let’s us change the Hostname, the domain name and add the DNS servers we want to choose. In a corporate environment we may have a local dns server so we can point at it at this prompt.
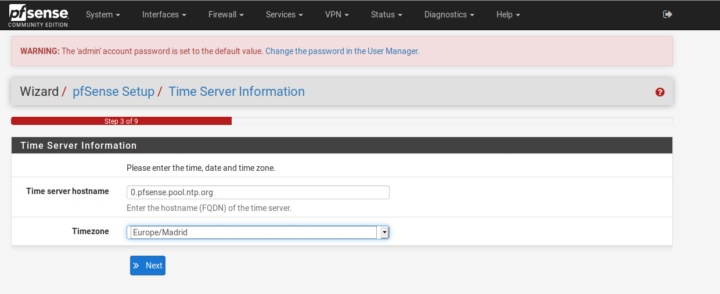
Select your time zone and choose a time server hostname at your will. You can leave the default one.
At the fourth prompt, make sure you deselect the RFC1918 Networks, so you can get traffic from the restricted addresses. For testing purposes this is ok. For production use leave it as it is.

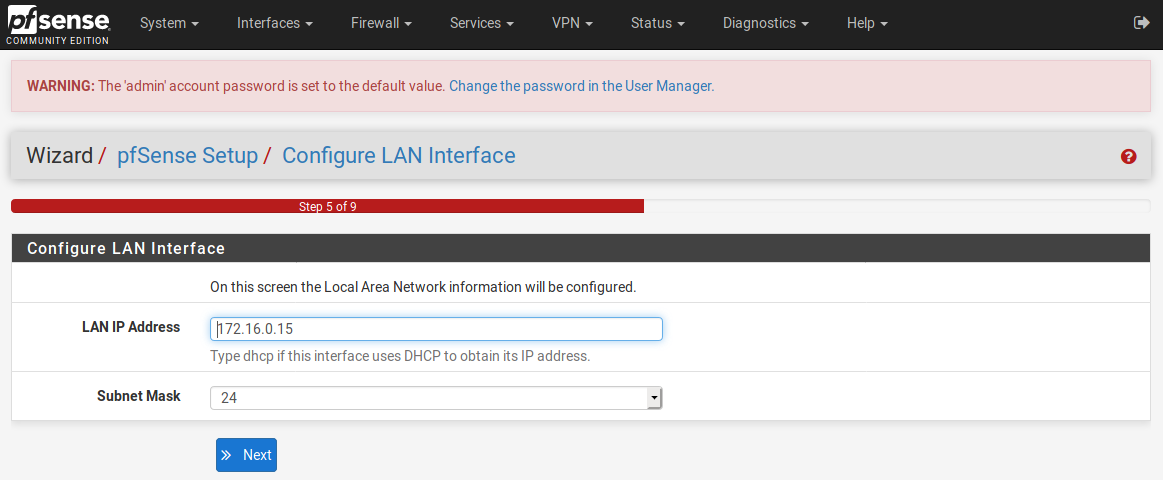
At the fifth prompt, something we are already familiar with. Don’t touch anything here.
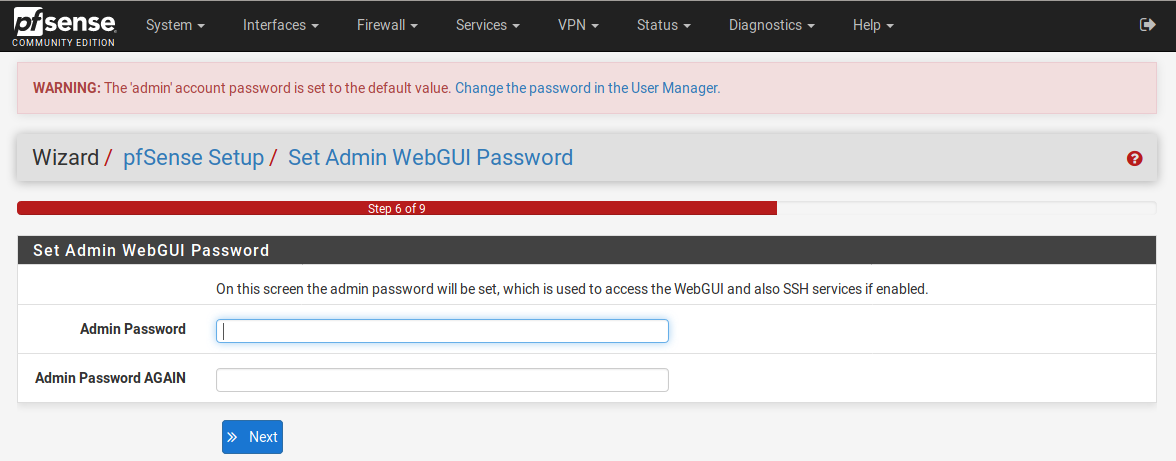
Time to change the default password. Remember to store yours in a safe place and/or use a password manager.
Click on ‘Reload’ so the changes are applied. And do not reload the web page, just click the button and wait.

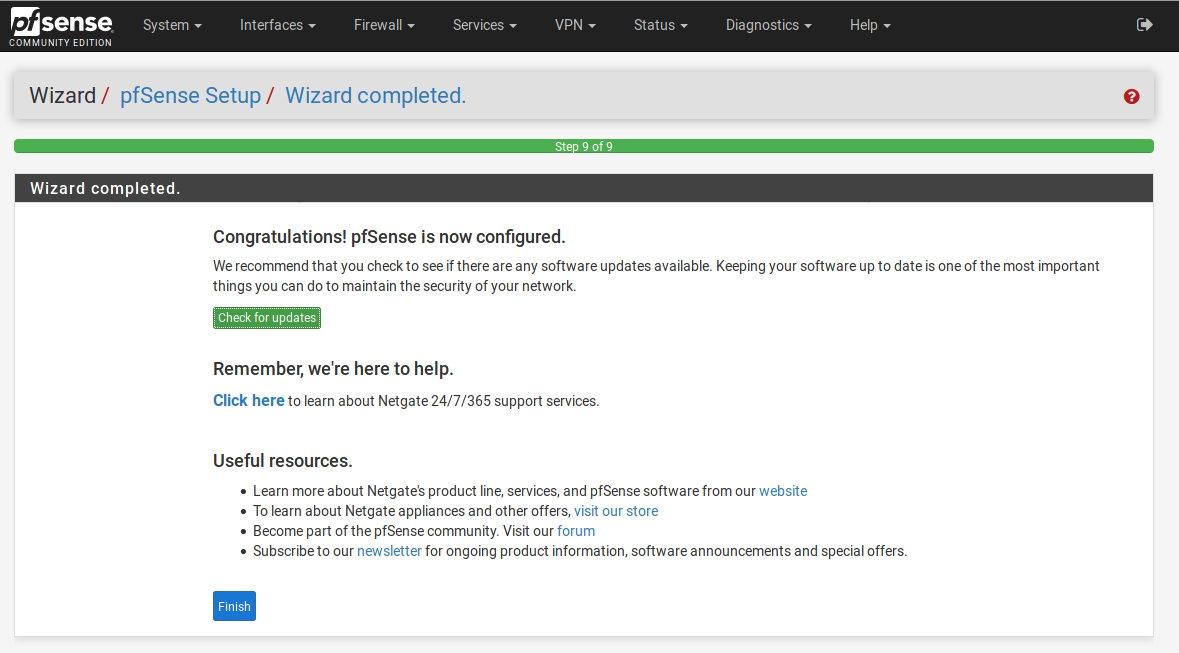
Last step. Click on Finish please.
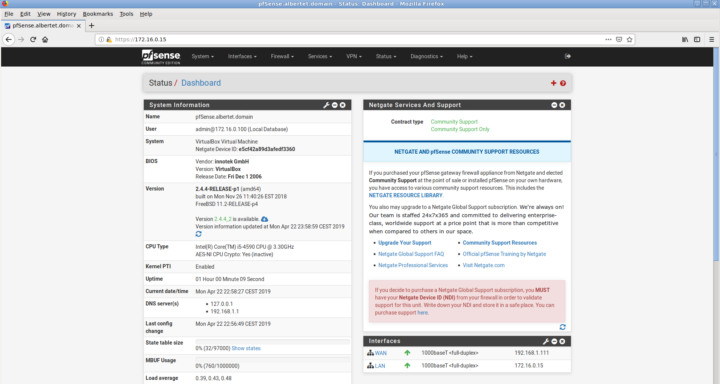
After accepting a legal notice, finally, the main dashboard before our eyes.
It is now time for you to play with the rules, the configurations, and enjoy this wonderful piece of software. This is all for this how to test pfSnese on VirtualBox running on FreeBSD.
If you find the articles in Adminbyaccident.com useful to you, please consider making a donation.
Use this link to get $200 credit at DigitalOcean and support Adminbyaccident.com costs.
Get $100 credit for free at Vultr using this link and support Adminbyaccident.com costs.
Mind Vultr supports FreeBSD on their VPS offer.