As it can be read in the last post, setting up a Cloudflare Argo Tunnel to serve web content from home or corporate network without poking holes to it, is quite easy to achieve. In this article I’ll show you how to enable TLS traffic from the origin server on Cloudflare Argo Tunnel. Obviously, you will want to serve your content at the edge server with TLS enabled too, but that’s quite easy. All without paying a penny.
If you find the articles in Adminbyaccident.com useful to you, please consider making a donation.
Use this link to get $200 credit at DigitalOcean and support Adminbyaccident.com costs.
Get $100 credit for free at Vultr using this link and support Adminbyaccident.com costs.
Mind Vultr supports FreeBSD on their VPS offer.
Pre-requisites
- Have an already set up Argo Tunnel in place.
- Full admin access to the Cloudflare account.
- Knowledge on how to set up a TLS enabled web server.
- A web server set up with Apache HTTP.
Summary
We will first enable TLS on the edge servers. Those are the servers Cloudflare is using to publish the content they are pulling from your origin server. This is the easiest part, and the certificates used are free and recognized by the major browsers as valid.
Then we will create a key and certificate pair using Cloudflare’s website. That pair will be then installed into the web server. For that to be operational we’ll need to enable TLS connectivity into the server. After having set up that TLS capability on the web server we will reconfigure the Argo Tunnel to get it running the certificates we’ve installed. Last, but not least, we will restart the tunnel issuing a very much needed flag and we will check if everything is running smoothly. For extra assurance we will also disable port 80 on the webserver and leave 443 as the only one pushing content.
Let’s get into it.
Step 1.- Enabling TLS on the edge servers
For this we will head up to the Cloudflare’s website and we will switch up a toggle. First, visit the web page inside your domain and look for the SSL/TLS “Overview” option.
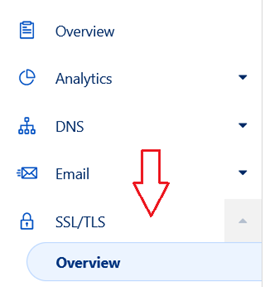
Once in, you should see a very similar panel to this one, but surely with a different option set up. Don’t worry about that now, we’ll fix it later.
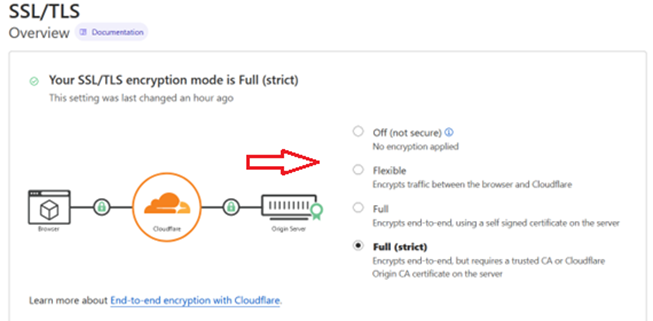
This above is the final result you want, but right now, it’s quite possible your configuration is set to “Off”. What you want already, out of the gate, is having certificates from Cloudflare’s servers running, so whenever a visitor comes in, the connection between the visitor and Cloudflare is encrypted. For that to happen, click on the “Flexible” option to enable TLS at the edge servers level.
Before we move into the next step just test your site is running with TLS certificates from Cloudflare. Just use your browser and eyeballs for this test.
If the site is up and running, and you see no errors, it’s a good idea to check the certificates you’re seeing.
You will see a similar issuer to this one:

Tip: Do not forget to switch this on (see below), so every request made using HTTP will be redirected to use HTTPS instead.

Now we’ve checked the edge certificates are working, we can move on to the next phase.
Step 2.- Create private key and certificate pair
You can use Cloudflare’s issued certificates with easy, or you may want to use self-signed ones, or any paid certificate you may have. In this guide I’ll use Cloudflare’s ones, which are no cost, but I could easily get self-signed ones.
For this step, go visit the “Origin Server” option in the SSL/TLS menu, under your domain page.
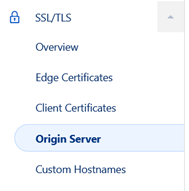
You will then see this on your right panel.

Even if you see an already created certificate, don’t use it, you’ll not have the key. Create a new certificate instead.
After clicking on “Create Certificate” you will see a page similar to this below:
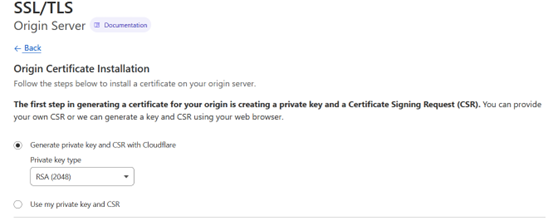
We will use the already marked option, which is “Generate private key and CSR with Cloudflare”. But, as you can see, there’s the option to use yours, which is convenient if, for example, you run your own Certificate Authority.
Just down below these two options, there’s a box to fill up with the domain names, or hostnames, you may want to use this certificate-key pair for.

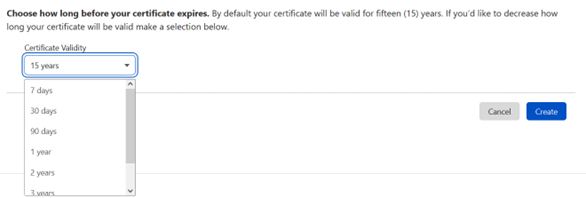
After you’ve done that, just look at the bottom of the page, where you will find the expiration date for this certificate. The default is set to 15 years. If you feel comfortable with that, just go ahead, and click on “Create”. If not, just check the time options and then hit it.
After clicking on create you will be able to see the certificate and key pair content.
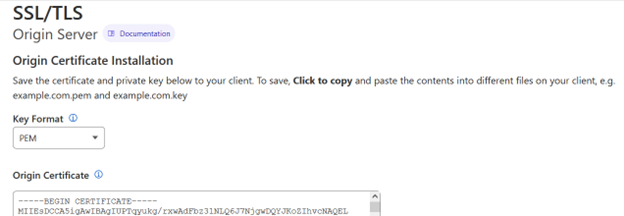
This above screenshot is for the certificate. And the one below this line is for the key.
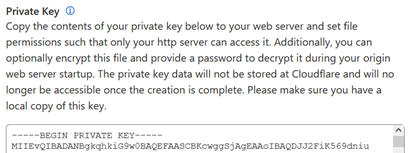
Tip: You will probably want to use .PEM formatted certificate and key pairs, but at the top you will find the option to choose other formats.
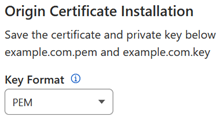
Once you’ve finished copying the key and certificate pair safely, click on “Ok” at the very bottom of the page.
You will see now the certificate in the “Origin Server” menu.

Tip: Store the key and certificate content in your origin server ASAP, and make sure you use any text editor temporarily, so these two are never leaked anywhere out of your control. If these were leaked, anyone intercepting the connection would be able to sniff traffic in the tunnel.
If you are reading this guide there’s a good chance you understand certificates and private keys a bit. However, this tip/disclaimer is very necessary for people less familiar of the security implications.
With this we can move to the next step and install the certificate and key pair inside the web server.
Step 3.- Install the certificate and private key on the server
I shouldn’t go long into describing how this is achieved. If you have already set up a web server spitting out pages using HTTPS you already know this. If you haven’t follow along but if you struggle look for some guidance elsewhere. In this other article you will see how to create a self-signed certificate but how to install it too.
Note: I mainly use FreeBSD, but I have set up different Linux systems in the past. If you happen to use a Linux system, just adapt the paths and filenames (e.g. Debian/Ubuntu users) to your needs.
First, we’ll enable the TLS module in Apache HTTP. For that to happen we need to know on which line that module is sitting on. Issue this command to find the line to edit.
grep -n 'mod_ssl.so' /usr/local/etc/apache24/httpd.conf
In the default httpd.conf file that module is sitting on the line 148. Now just edit that line and uncomment it by removing the ‘#’ symbol at the beginning of the line.
Now we will enable the SSL/TLS configuration in Apache HTTP. We’ll look on which line that is sitting too.
grep -n 'httpd-ssl.conf' /usr/local/etc/apache24/httpd.conf
You will get a result if not identical, very similar as this:
[user@cloudflare ~]$ grep -n 'httpd-ssl.conf' /usr/local/etc/apache24/httpd.conf
526:#Include etc/apache24/extra/httpd-ssl.conf
[user@cloudflare ~]$
So, edit line 526 and remove the ‘#’ at the beginning, in order to enable the default SSL/TLS configuration.
Now, we have the configuration in place, but our certificate and key aren’t installed yet. Let’s see where does the default TLS configuration states as the path for the certificate and the key. Use this next command to find out where those are sitting in the default configuration.
grep -n 'SSLCertificateFile' /usr/local/etc/apache24/extra/httpd-ssl.conf
You should get something close to this:
[user@cloudflare ~]$ grep -n 'SSLCertificateFile' /usr/local/etc/apache24/extra/httpd-ssl.conf
136:# Point SSLCertificateFile at a PEM encoded certificate. If
145:#SSLCertificateFile "/usr/local/etc/apache24/server.crt"
146:#SSLCertificateFile "/usr/local/etc/apache24/server-dsa.crt"
147:#SSLCertificateFile "/usr/local/etc/apache24/server-ecc.crt"
163:# the referenced file can be the same as SSLCertificateFile
[user@cloudflare ~]$
We will edit the line 145 and we will remove the ‘#’ character to enable that path. After that we will install our certificate into that path.
To install the certficiate in the “/usr/local/etc/apache24/server.crt” path we will first create the file with this next command:
sudo touch "/usr/local/etc/apache24/server.crt"
One the file is created with our favorite editor we will copy and paste the content of the certificate we’ve generated in the Cloudflare’s site.
Now it’s time to repeat this same operation with the private key file. Let’s find out where that is declared in the default TLS configuration.
grep -n 'SSLCertificateKeyFile' /usr/local/etc/apache24/extra/httpd-ssl.conf
With this above command we will receive an answer very close to this below.
[user@cloudflare ~]$ grep -n 'SSLCertificateKeyFile' /usr/local/etc/apache24/extra/httpd-ssl.conf
155:#SSLCertificateKeyFile "/usr/local/etc/apache24/server.key"
156:#SSLCertificateKeyFile "/usr/local/etc/apache24/server-dsa.key"
157:#SSLCertificateKeyFile "/usr/local/etc/apache24/server-ecc.key"
[user@cloudflare ~]$
Edit the line 155 and remove the ‘#’ in the beginning of it in order to activate that directive.
As we did with the certificate we will create the file to copy and paste the key we’ve generated in Cloudflare.
sudo touch /usr/local/etc/apache24/server.key
Now, with our editor of choise, paste the key content inside.
At this point we can issue a test command so we can check if our configuration is sane.
sudo apachectl -t
And it will surely say something is wrong. You will probably see a message with the following:
[user@cloudflare ~]$ sudo apachectl -t
AH00526: Syntax error on line 92 of /usr/local/etc/apache24/extra/httpd-ssl.conf:
SSLSessionCache: 'shmcb' session cache not supported (known names: ). Maybe you need to load the appropriate socache module (mod_socache_shmcb?).
[user@cloudflare ~]$
This message is telling us there’s a directive in the default TLS configuration file ‘httpd-ss.conf’ that is calling to a module which hasn’t been enabled in the main’s Apache HTTP configuration file ‘httpd.conf’. Let’s correct that line in ‘httpd.conf’ by removing the ‘#’ at the beginning of line 92.
Now, after setting all up, when we issue the test command in Apache HTTP we should see a message like this.
[user@cloudflare ~]$ sudo apachectl -t
Syntax OK
[user@cloudflare ~]$
Since everything is ok we can now restart the Apache HTTP.
By restarting Apache HTTP now, the tunnel will not be disrupted but, we will not be encrypting traffic through it with the key and certificate key. We will have to do more things for that to happen. Let’s do those things, so we can enable TLS traffic from the origin server in Cloudflare. Things like changing the configuration on the yaml file on cloudflared configuration.
Step 4.- Change the cloudflared configuration for the tunnel
Since I’m running the tunnel as a regular user, the configuration for cloudlfared is inside a ‘.cloudflared’ directory out of the ‘/root’ one. So bear in mind what your actual path is for the cloudlfared config file.
My configuration reads as follows:
[user@cloudflare ~]$ cat .cloudflared/config.yaml
url: http://172.16.40.5:80
tunnel: 25626f56-b4e5-2255-368c-10fa631kl247
credentials-file: /home/user/.cloudflared/25626f56-b4e5-2255-368c-10fa631kl247.json
[user@cloudflare ~]$
Now, in the ‘url’ section, make the changes needed to run https, instead of http. That is leaving that directive as follows:
url: https://172.16.40.5:443
Notice the https protocol instead of the http one, as well as declaring the right port (443). You can tune that up to your specification, just remember to put the same one on your Apache HTTP TLS configuration.
With this done, we are almost there to run the tunnel, but we first need to enable a switch on Cloudflare’s website.

In other words, make sure this toggle above is on before stopping and running back again your tunnel willing to server HTTPS traffic through it.
With all the set up already in place it is time to restart the tunnel and test it. Let’s go at it.
Step 5.- Restart the Cloudflare Argo Tunnel
If you happen to use FreeBSD and have read my tutorial for setting up the Argo Tunnel, you will see it’s not running as a regular service since it lacks proper configuration in /etc/rc.d (testing for that is coming). So, in order to stop the tunnel we will make use of the ‘kill’ command. But with the ‘-15’ option for a graceful stop.
First, we will have to look what process id the tunnel is running on. Use this next command for that.
ps auxww | grep cloudflared
You should get something similar to this below.
[user@cloudflare ~]$ ps auxww | grep cloudflared
user 58069 0.0 0.6 768152 47056 1 SJ 15:08 0:20.01 /usr/local/bin/cloudflared tunnel run 25626f56-b4e5-2255-368c-10fa631kl247
user 58599 0.0 0.0 12840 2088 1 S+J 18:44 0:00.00 grep cloudflared
[user@cloudflare ~]$
Stop the service gracefully by issuing the kill command as follows:
sudo kill -15 58069
Tip: Use the process ID number (PID) the ps command has given you.
Now we can run the tunnel again but with a special flag, otherwise we will not be able to run TLS inside the tunnel with Cloudflare.
nohup /usr/local/bin/cloudflared tunnel --no-tls-verify --url https://172.16.40.5:443 run 25626f56-b4e5-2255-368c-10fa631kl247 &
Notice the two flags –no-tls-verify and –url. Those will allow the self-signed certificated we’ve generated in the Cloudflare’s site to be used. Without these flags the tunnel will run but no TLS traffic will be generated.
Let’s check again if the tunnel is up and running.
[user@cloudflare ~]$ ps auxww | grep cloudflared
Bert 58182 0.0 0.6 768152 47056 1 SJ 15:08 0:20.01 /usr/local/bin/cloudflared tunnel run 25626f56-b4e5-2255-368c-10fa631kl247
user 58602 0.0 0.0 12840 2088 1 S+J 18:44 0:00.00 grep cloudflared
[user@cloudflare ~]$
And yes it is. We can now move on to make some other checks.
Step 6.- Final checks
An important point in this how to enable TLS traffic from the Origin server on Cloudflare Argo Tunnel. As we did in step 1 we can just use the browser and our eyeballs to see if the page is correctly loading. It should.
Another way to check this is by issuing a sockstat command.
[user@cloudflare ~]$ sockstat -4
USER COMMAND PID FD PROTO LOCAL ADDRESS FOREIGN ADDRESS
www httpd 58652 3 tcp4 172.16.40.5:80 *:*
www httpd 58652 4 tcp4 172.16.40.5:443 *:*
www httpd 58651 3 tcp4 172.16.40.5:80 *:*
www httpd 58651 4 tcp4 172.16.40.5:443 *:*
www httpd 58650 3 tcp4 172.16.40.5:80 *:*
www httpd 58650 4 tcp4 172.16.40.5:443 *:*
root httpd 58649 3 tcp4 172.16.40.5:80 *:*
root httpd 58649 4 tcp4 172.16.40.5:443 *:*
user cloudflare 58069 5 tcp4 172.16.40.5:16132 *:*
user cloudflare 58069 9 udp4 172.16.40.5:12378 *:*
user cloudflare 58069 10 udp4 172.16.40.5:58421 *:*
user cloudflare 58069 11 udp4 172.16.40.5:51036 *:*
user cloudflare 58069 12 udp4 172.16.40.5:31904 *:*
[user@cloudflare ~]$
As you can see there’s a mixture of sockets opened for Apache HTTP on port 80 and 443. This is how the web server is set up, to serve content through both ports.
However, our initial goal was and still is to serve traffic from the origin server up to the very browser of the client visiting our site. And that goal is being accomplished despite we are seeing open sockets on port 80. This is easily verifiable with this next command.
[user@cloudflare ~]$ netstat -4
Active Internet connections
Proto Recv-Q Send-Q Local Address Foreign Address (state)
tcp4 0 0 cloudflare.https cloudflare.34674 ESTABLISHED
tcp4 0 0 cloudflare.34674 cloudflare.443 ESTABLISHED
tcp4 0 0 cloudflare.https cloudflare.49366 TIME_WAIT
tcp4 0 0 cloudflare.49366 cloudflare.443 TIME_WAIT
udp4 0 0 cloudflare.31904 *.*
udp4 0 0 cloudflare.51036 *.*
udp4 0 0 cloudflare.58421 *.*
udp4 0 0 cloudflare.12378 *.*
[user@cloudflare ~]$
Notice cloudflare is connecting to us on port 443 only. Remember, on step 4 we have changed the tunnel’s configuration to use port 443 instead of port 80 as it was before.
The final proof we are using TLS encryption inside the tunnel is by switching off port 80 altogether in the web server.
Step 7.- Disable HTTP traffic on the web server.
This operation shouldn’t cause any disruption in the tunnel. If it does, something is not right.
We will first locate the ‘Listen’ directive in the main httpd.conf configuration file. Use the following command for that.
grep -n 'Listen' /usr/local/etc/apache24/httpd.conf
My ‘Listen’ directive is located in the line 52. I’ll edit it and comment it out by putting (NOT removing) a ‘#’ character at the beginning of the line. This is how it should read after the edit.
#Listen 80
Now, once the file has been edited it is time to restart Apache HTTP.
If we now reissue the sockstat command we will see all the sockets related to the port 80 have disappeared.
[user@cloudflare ~]$ sockstat -4
USER COMMAND PID FD PROTO LOCAL ADDRESS FOREIGN ADDRESS
www httpd 58652 4 tcp4 172.16.40.5:443 *:*
www httpd 58651 4 tcp4 172.16.40.5:443 *:*
www httpd 58650 4 tcp4 172.16.40.5:443 *:*
root httpd 58649 4 tcp4 172.16.40.5:443 *:*
user cloudflare 58069 5 tcp4 172.16.40.5:16132 *:*
user cloudflare 58069 9 udp4 172.16.40.5:12378 *:*
user cloudflare 58069 10 udp4 172.16.40.5:58421 *:*
user cloudflare 58069 11 udp4 172.16.40.5:51036 *:*
user cloudflare 58069 12 udp4 172.16.40.5:31904 *:*
[user@cloudflare ~]$
The final test is getting our hands in a browser and typing our site’s address again. We should see no issue and the page being loaded without a hassle.
Step 8.- Change the TLS settings in Cloudflare’s console
As we’ve seen in the beginning of this guide, we can choose what level of TLS configuration we want to have. In the first step we’ve set it up to the ‘Flexible’ level. Now, we can change that and go straight up to the highest level and choose “Full (strict)” level.
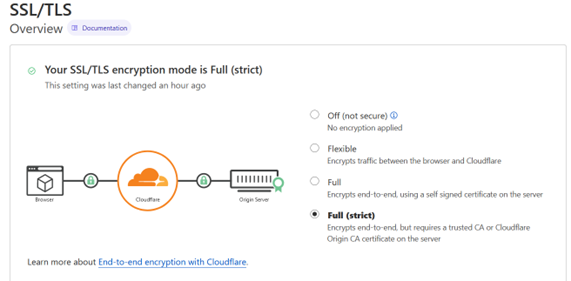
With this last step we do not only have TLS traffic inside the Cloudflare Argo Tunnel but full encryption end to end for any visitor to our website.
Security considerations
I would recommend to anyone using Cloudflare’s Argo Tunnel to enable TLS inside the tunnel. But this is not a security panacea. Cloudflare needs to be aware of the certificate and key pair in order for the service to work. So, they are acting like a ‘man in the middle’ but without being malicious. They are your proxy to the world. If you trust them, this is ok. If you don’t, just don’t run this service. Period.
Another consideration may be inspecting traffic. If you happen to analyze your traffic it is easier to parse HTTP than HTTPS is. If you have any inspection tool like an IDS such as Suricata on your internal network, you will have better performance and visibility without this TLS thing. This said, you can always install the certificate and key in the tool’s you’re using and give a try to inspect that encrypted traffic.
Conclusion
Running Cloudflare’s Argo Tunnel with TLS traffic enabled on it gives a peace of mind to me and to anyone doing it. As you’ve seen in this how to enable TLS traffic from the origin server con Cloudflare Argo Tunnel, it is not that difficult and it can be run at no cost.
If you find the articles in Adminbyaccident.com useful to you, please consider making a donation.
Use this link to get $200 credit at DigitalOcean and support Adminbyaccident.com costs.
Get $100 credit for free at Vultr using this link and support Adminbyaccident.com costs.
Mind Vultr supports FreeBSD on their VPS offer.